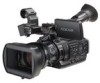
Sony PMW200 User Manual (PMW-100 Memory Camcorder Operation Manual for Firmwar - Page 38
Press the REC START/STOP button., To stop recording, press the REC, START/STOP button again.
 |
View all Sony PMW200 manuals
Add to My Manuals
Save this manual to your list of manuals |
Page 38 highlights
Recording "White Balance" on page 40 Note AF (Auto Focus) is not activated by setting the camcorder to Full Auto mode. For information of automatic focus adjustment, see "Focus" (page 43). 7 Press the REC START/STOP button. You can also start recording with the REC START button on the grip. (If you are using the IR Remote Commander, press the REC button simultaneously with the unmarked button.) The front and rear tally lamps light and recording begins. 8 To stop recording, press the REC START/STOP button again. You can also stop recording with the REC START button on the grip. (If you are using the IR Remote Commander, press the REC PAUSE button simultaneously with the unmarked button.) Recording stops and the camcorder enters STBY (recording standby) mode. Note If you press the REC START/STOP button to start next recording while previous data writing is not completed, the message "Cannot Proceed" may be displayed and recording may not start. To prevent a switching error The REC START/STOP button on the handle is incorporated with the REC HOLD lever. If the REC START/STOP button on the handle will not be used, it is recommended to set the lever to the HOLD position to lock the button and prevent unintentional starting/stopping of recording if you accidentally press the button. To unlock the button, return the lever to its original position. Checking the last recorded clip (Rec Review) 9 Press the REC REVIEW button. The Rec Review function (page 48) is activated, and the last recorded clip is played back for the specified time on the LCD monitor/EVF screen. To delete clips You can delete the last recorded clip by using the Last Clip DEL function (page 61). Use the All Clips DEL function (page 61) to delete all recorded clips from an SxS memory card. To specify a clip to be deleted, operate the camcorder from the thumbnail screen (page 65). Clip (recording data) When you stop recording, video, audio and subsidiary data from the start to end of the recording are recorded as a single clip on an SxS memory card. Clip name For each clip recorded with this camcorder, a clip name is automatically generated according to the method selected with "Auto Naming" in "Clip" (page 100) in the OTHERS menu. The default setting of "Auto Naming" is "Plan." With this setting, a clip name defined in planning metadata is applied if a planning metadata file is loaded into the camcorder. Change the "Auto Naming" setting to "Title" to apply a clip name composed of 4 to 46 alphanumerics and 4 numerics. Example: ABCD0001 The block of 4 to 46 alphanumerics can be specified as desired using "Clip" in the OTHERS menu before you start recording. (It cannot be changed after recording.) The value of the 4 numerics is automatically counted up in sequence. Notes on Clips The maximum file size for a clip is 43 GB for UDF, 4 GB for FAT in HD Mode, and 2 GB for FAT in SD Mode. If you continue recording for an extended period, recorded materials may be segmented into multiple files, depending on the file size (the maximum number of partitions is 99). The camcorder regards continuous recording as one clip even if it has been segmented into multiple files. A long clip can be recorded crossing over two memory cards in slot A and B. When you copy recorded clips to a hard disk, etc., via computer, it is recommended to use the dedicated application software, which you need to download, to maintain the continuity of recorded materials. For details, see "Software Downloads" (page 136). 38 Basic Operation Procedure
-
 1
1 -
2
-
3
-
4
-
5
-
6
-
7
-
8
-
9
-
10
-
11
-
12
-
13
-
14
-
15
-
16
-
17
-
18
-
19
-
20
-
21
-
22
-
23
-
24
-
25
-
26
-
27
-
28
-
29
-
30
-
31
-
32
-
 33
33 -
 34
34 -
 35
35 -
 36
36 -
 37
37 -
 38
38 -
 39
39 -
 40
40 -
 41
41 -
 42
42 -
 43
43 -
44
-
45
-
46
-
47
-
48
-
49
-
50
-
51
-
52
-
53
-
54
-
55
-
56
-
57
-
58
-
59
-
60
-
61
-
62
-
63
-
64
-
65
-
66
-
67
-
68
-
69
-
70
-
71
-
72
-
73
-
74
-
75
-
76
-
77
-
78
-
79
-
80
-
81
-
82
-
83
-
84
-
85
-
86
-
87
-
88
-
89
-
90
-
91
-
92
-
93
-
94
-
95
-
96
-
97
-
98
-
99
-
100
-
101
-
102
-
103
-
104
-
105
-
106
-
107
-
108
-
109
-
110
-
111
-
112
-
113
-
114
-
115
-
116
-
117
-
118
-
119
-
120
-
121
-
122
-
123
-
124
-
125
-
126
-
127
-
128
-
129
-
130
-
131
-
132
-
133
-
134
-
135
-
136
-
137
-
138
-
139
-
140
-
141
-
142
 |
 |