Sony PMW200 User Manual (PMW-100 Memory Camcorder Operation Manual for Firmwar - Page 47
Monitoring the Audio, Useful Functions, Color Bars/Reference Tone, Shot Marks
 |
View all Sony PMW200 manuals
Add to My Manuals
Save this manual to your list of manuals |
Page 47 highlights
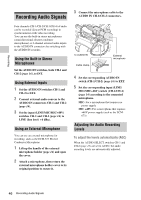
Recording To adjust the levels manually Set the AUDIO SELECT switches CH-1 and CH2 to MANUAL and adjust the audio recording levels by turning the AUDIO LEVEL knobs (page 16). Set the controls to 5 for the reference setting (0 dB). Setting to 10 maximizes the level (+12 dB), and setting to 0 minimizes it (-∞). The input levels are displayed on the screen when you press the DISPLAY button (page 19). Audio recording in special recording modes No audio recording is made in Interval Recording or Frame Recording. No audio recording is made in Slow & Quick recording if the recording frame rate is set to a value different from the playback frame rate. Monitoring the Audio You can monitor the sounds being recorded with the headphones connected to the headphone connector (stereo mini jack) (page 13). Note The built-in speaker is disabled during recording (or when standing by to record). To adjust the audio monitoring volume Use the VOLUME buttons (page 15). Useful Functions Color Bars/Reference Tone By setting "Camera/Bars" in "Color Bars" (page 83) in the CAMERA SET menu to "Bars," you can output a color-bar signal in place of the camera picture. When this item is set to "Camera," the output returns to the camera picture. A 1-kHz reference tone is output with the color bar signal if "1KHz Tone" in "Audio Input" (page 88) in the AUDIO SET menu is set to "On." The color-bar signal and reference-tone signal are also fed out from the SDI OUT, HDMI OUT, i.LINK, VIDEO OUT (color bars only), and A/V OUT connectors. You can select the type of color bars with "Bars Type" in "Color Bars" in the CAMERA SET menu. Notes • The color bar mode cannot be output in Slow & Quick Motion mode and SLS/EX SLS mode. • You cannot switch to "Color Bars" while recording. (Switching from "Color Bars" to "Camera" is available.) Shot Marks When you record shot marks for important scenes of a clip recorded in UDF or FAT HD as subsidiary data, you can access the marked points easily on a Shot Mark screen (page 74), which only displays scenes with shot marks only. This increases editing efficiency. The camcorder permits you to record two types of shot marks: shot mark 1 and shot mark 2. Shot marks can be recorded as needed during recording or can be added after recording while checking the playback pictures on the thumbnail screen. Inserting a shot mark during recording Activate the IR Remote Commander (page 24), and press the SHOTMARK 1 or SHOTMARK 2 button where you want to insert a shot mark. If the Shot Mark1 or Shot Mark2 function is assigned to Useful Functions 47
-
 1
1 -
2
-
3
-
4
-
5
-
6
-
7
-
8
-
9
-
10
-
11
-
12
-
13
-
14
-
15
-
16
-
17
-
18
-
19
-
20
-
21
-
22
-
23
-
24
-
25
-
26
-
27
-
28
-
29
-
30
-
31
-
32
-
33
-
34
-
35
-
36
-
37
-
38
-
39
-
40
-
41
-
 42
42 -
 43
43 -
 44
44 -
 45
45 -
 46
46 -
 47
47 -
 48
48 -
 49
49 -
 50
50 -
 51
51 -
 52
52 -
53
-
54
-
55
-
56
-
57
-
58
-
59
-
60
-
61
-
62
-
63
-
64
-
65
-
66
-
67
-
68
-
69
-
70
-
71
-
72
-
73
-
74
-
75
-
76
-
77
-
78
-
79
-
80
-
81
-
82
-
83
-
84
-
85
-
86
-
87
-
88
-
89
-
90
-
91
-
92
-
93
-
94
-
95
-
96
-
97
-
98
-
99
-
100
-
101
-
102
-
103
-
104
-
105
-
106
-
107
-
108
-
109
-
110
-
111
-
112
-
113
-
114
-
115
-
116
-
117
-
118
-
119
-
120
-
121
-
122
-
123
-
124
-
125
-
126
-
127
-
128
-
129
-
130
-
131
-
132
-
133
-
134
-
135
-
136
-
137
-
138
-
139
-
140
-
141
-
142
 |
 |