Sony PMW200 User Manual (PMW-100 Memory Camcorder Operation Manual for Firmwar - Page 74
Adding/Deleting Shot Marks (UDF and FAT HD Mode), Changing the Index Frame (UDF and FAT HD Mode)
 |
View all Sony PMW200 manuals
Add to My Manuals
Save this manual to your list of manuals |
Page 74 highlights
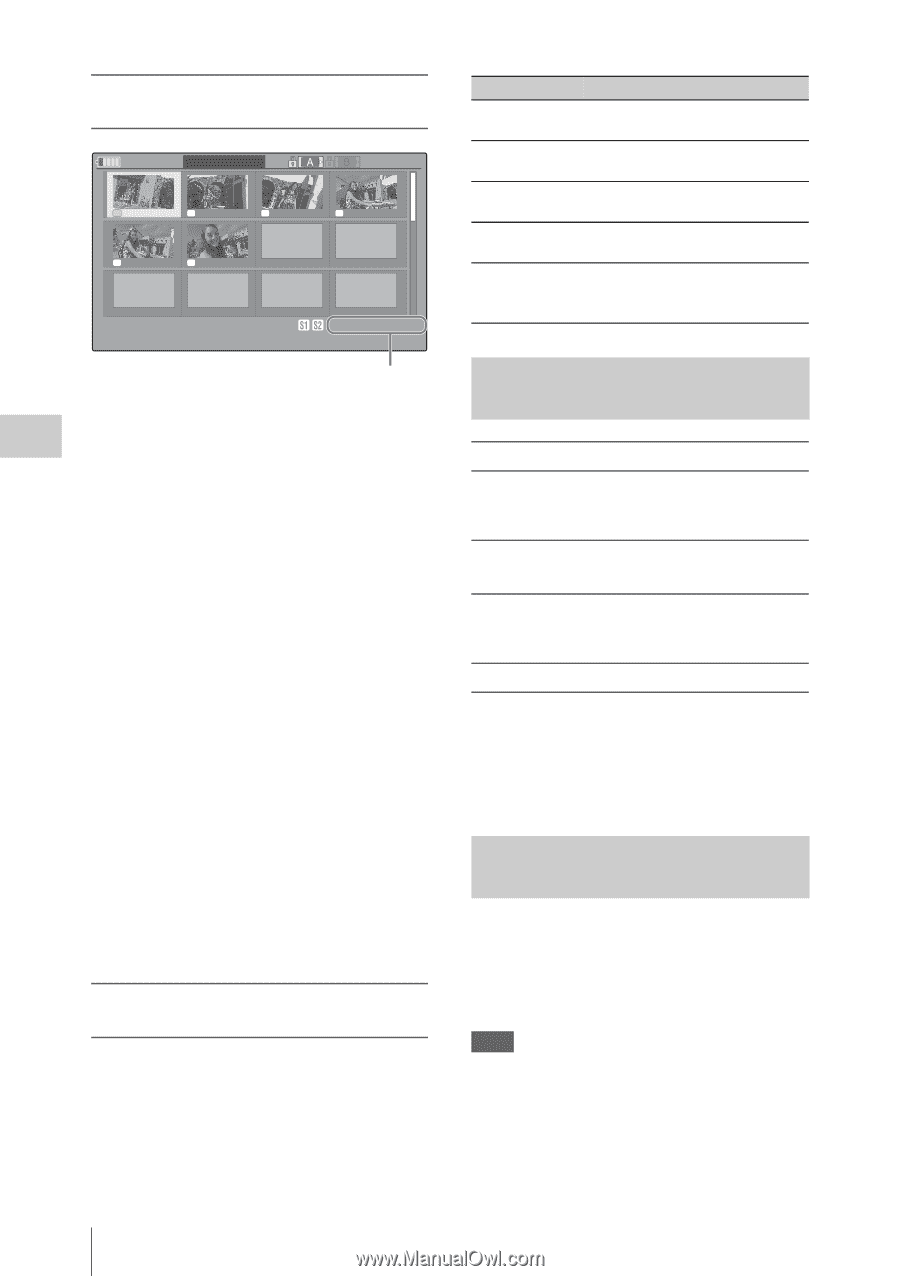
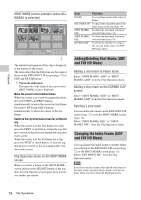
Playback SHOT MARK screen example (when ALL MARKS is selected) 120min SHOT MARK1 0031 / 0031 S1 01 : 10 : 20 : 00 S2 01 : 10 : 30 : 00 S2 01 : 10 : 40 : 00 S1 01 : 10 : 50 : 00 S1 01 : 11 : 00 : 00 S1 01 : 11 : 10 : 00 - - - - - - - - - - - - - - - 01 / JAN / 2009 10 : 53 S&Q 29 / 24 JPAN0011( 1 ) HQ 1920 / 23 . 9 P - - - TCR 01 : 12: 00 : 00 DUR 00 : 03 : 19 : 23 1 The detailed information of the clip is displayed at the bottom of the screen. The items other than the following are the same as those on the EXPAND CLIP screen (page 72) in UDF and FAT HD mode: 1. Timecode indication The timecode of the frame at the cursor on the SHOT MARK screen is displayed. Move the cursor to the first/last frame When the cursor is at a user-designated position, press the F REV and PREV buttons simultaneously to move the cursor the first frame. Press the F FWD and NEXT buttons simultaneously to move the cursor to the last frame. Switch to the clip shot mark screen for a different clip When the cursor is at the first frame for a clip, press the PREV or up button, or turn the jog dial up to switch to the previous displayable clip shot mark screen. When the cursor is at the last frame for a clip, press the NEXT or down button, or turn the jog dial down to switch to the next displayable clip shot mark screen. Clip Operation menu on the SHOT MARK screen When you select a frame on the SHOT MARK screen and press the SEL/SET button or the jog dial, the Clip Operation menu pops up to permit you further operations. Item Function PAUSE To set to Pause mode at the selected frame SET INDEX PIC To specify the selected frame for the index frame of the clip (page 74) SHOT MARK1 To delete the shot mark 1 from the DEL selected frame (page 74) SHOT MARK2 To delete the shot mark 2 from the DEL selected frame (page 74) DIVIDE CLIP To divide the clip into two clips at the selected frame (page 75) (FAT HD mode Only) Adding/Deleting Shot Marks (UDF and FAT HD Mode) Adding a shot mark in Pause mode Select "SHOT MARK1 ADD" or "SHOT MARK2 ADD" from the Clip Operation menu. Adding a shot mark on the EXPAND CLIP screen Select "SHOT MARK1 ADD" or "SHOT MARK2 ADD" from the Clip Operation menu. Deleting a shot mark You can delete shot marks on the EXPAND CLIP screen (page 72) or on the SHOT MARK screen (page 73). Select "SHOT MARK1 DEL" or "SHOT MARK2 DEL" from the Clip Operation menu. Changing the Index Frame (UDF and FAT HD Mode) You can change the index frame to another frame you selected on the EXPAND CLIP screen (page 72) or the SHOT MARK screen (page 73). Select "SET INDEX PIC" from the Clip Operation menu. Note Even if you specify a frame other than the top frame for the index frame, playback always begins from the top frame when you start it from the thumbnail screen. 74 Clip Operations
-
 1
1 -
2
-
3
-
4
-
5
-
6
-
7
-
8
-
9
-
10
-
11
-
12
-
13
-
14
-
15
-
16
-
17
-
18
-
19
-
20
-
21
-
22
-
23
-
24
-
25
-
26
-
27
-
28
-
29
-
30
-
31
-
32
-
33
-
34
-
35
-
36
-
37
-
38
-
39
-
40
-
41
-
42
-
43
-
44
-
45
-
46
-
47
-
48
-
49
-
50
-
51
-
52
-
53
-
54
-
55
-
56
-
57
-
58
-
59
-
60
-
61
-
62
-
63
-
64
-
65
-
66
-
67
-
68
-
 69
69 -
 70
70 -
 71
71 -
 72
72 -
 73
73 -
 74
74 -
 75
75 -
 76
76 -
 77
77 -
 78
78 -
 79
79 -
80
-
81
-
82
-
83
-
84
-
85
-
86
-
87
-
88
-
89
-
90
-
91
-
92
-
93
-
94
-
95
-
96
-
97
-
98
-
99
-
100
-
101
-
102
-
103
-
104
-
105
-
106
-
107
-
108
-
109
-
110
-
111
-
112
-
113
-
114
-
115
-
116
-
117
-
118
-
119
-
120
-
121
-
122
-
123
-
124
-
125
-
126
-
127
-
128
-
129
-
130
-
131
-
132
-
133
-
134
-
135
-
136
-
137
-
138
-
139
-
140
-
141
-
142
 |
 |