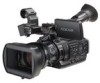
Sony PMW200 User Manual (PMW-100 Memory Camcorder Operation Manual for Firmwar - Page 111
Synchronizing the timecode of your, camcorder with that of another unit
 |
View all Sony PMW200 manuals
Add to My Manuals
Save this manual to your list of manuals |
Page 111 highlights
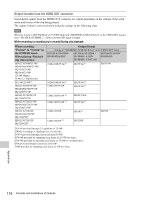
FAT Video format HQ 1920/50i HQ 1920/25P HQ 1440/50i HQ 1440/25P SP 1440/50i HQ 1280/50P HQ 1280/25P DVCAM50i SQ/EC DVCAM25P SQ/EC Valid reference signal 1080/50i PAL 1080/50i 720/50P PAL 1080/50i PAL The phase adjustment for the reference signal can also be made with "Genlock" (page 98) in the OTHERS menu. Notes • When the output format is SD mode and you use one of the video formats below, genlock is not possible. Set the video format to HD mode. UDF: HD422 50/720/59.94P, HD420 HQ/720/59.94P, HD422 50/720/50P, HD420 HQ/720/50P FAT: HQ 1280/59.94P, HQ 1280/50P • If the reference signal is unstable, genlock is not possible. • The subcarrier is not synchronized. Synchronizing the timecode of your camcorder with that of another unit Set the unit that supplies the timecode to a mode in which the timecode output keeps advancing (Free Run or Clock mode). 1 Set "Timecode" in the TC/UB SET menu as follows: Mode: Preset Run: Free Run 2 Press the DURATION/TC/U-BIT button (page 15) so that the timecode is displayed on the screen. 3 Confirm that the IN/OUT switch (page 17) is set to IN, then supply an HD or SD reference video signal to the GENLOCK IN connector and the reference timecode to the TC IN connector. The built-in timecode generator of your camcorder locks to the reference timecode, and the message "EXT-LK" is displayed on the screen. About 10 seconds after locking, even if the reference timecode from the external device is disconnected, the external lock will be kept. Notes • Check that the reference timecode and the reference video signal are in a phase relation that complies the SMPTE timecode standards. • When you finish the above procedure, the timecode is immediately synchronized with the external timecode, and the time data indication will show the value of the external timecode. However, wait for a few seconds until the timecode generator stabilizes before recording. • If the frequency of the reference video signal and the frame frequency are not the same, a lock cannot be acquired, and the camcorder will not operate properly. In such a case, the timecode will not be correctly locked to the external timecode. • When the connection is removed, the timecode advance may shift one frame per hour with respect to the reference timecode. To release the external timecode synchronization Change the "Timecode" setting in the TC/UB SET menu set the camcorder to OFF. External synchronization is also released when you start recording in a special recording mode (Slow & Quick Motion, Frame Rec, or Interval Rec). Synchronizing the timecode of another unit with that of your camcorder 1 Specify the timecode of your camcorder with "Timecode" and "TC Format" (page 45). 2 Confirm that the IN/OUT switch (page 17) is set to OUT, then connect the TC OUT connector and VIDEO OUT connector (page 17) with the timecode input and reference signal input of the other unit, respectively. The timecode to be output from the TC OUT connector depends on the setting of "TC Out" in "Timecode" in the TC/UB SET menu. If "TC Out" is set to "Generator," the timecode generated by the timecode generator of the camcorder is output during recording and playback. If "TC Out" is set to "Auto," the timecode generated by the timecode generator is output during recording, and that superimposed with the video signal is output during playback. External Synchronization 111 Connecting External Devices
-
 1
1 -
2
-
3
-
4
-
5
-
6
-
7
-
8
-
9
-
10
-
11
-
12
-
13
-
14
-
15
-
16
-
17
-
18
-
19
-
20
-
21
-
22
-
23
-
24
-
25
-
26
-
27
-
28
-
29
-
30
-
31
-
32
-
33
-
34
-
35
-
36
-
37
-
38
-
39
-
40
-
41
-
42
-
43
-
44
-
45
-
46
-
47
-
48
-
49
-
50
-
51
-
52
-
53
-
54
-
55
-
56
-
57
-
58
-
59
-
60
-
61
-
62
-
63
-
64
-
65
-
66
-
67
-
68
-
69
-
70
-
71
-
72
-
73
-
74
-
75
-
76
-
77
-
78
-
79
-
80
-
81
-
82
-
83
-
84
-
85
-
86
-
87
-
88
-
89
-
90
-
91
-
92
-
93
-
94
-
95
-
96
-
97
-
98
-
99
-
100
-
101
-
102
-
103
-
104
-
105
-
 106
106 -
 107
107 -
 108
108 -
 109
109 -
 110
110 -
 111
111 -
 112
112 -
 113
113 -
 114
114 -
 115
115 -
 116
116 -
117
-
118
-
119
-
120
-
121
-
122
-
123
-
124
-
125
-
126
-
127
-
128
-
129
-
130
-
131
-
132
-
133
-
134
-
135
-
136
-
137
-
138
-
139
-
140
-
141
-
142
 |
 |
