Brother International WP700D Owners Manual - English - Page 128
Creating, Editing, Merge
 |
View all Brother International WP700D manuals
Add to My Manuals
Save this manual to your list of manuals |
Page 128 highlights
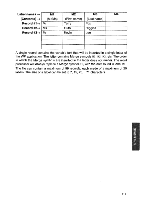
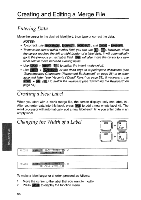
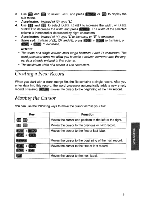
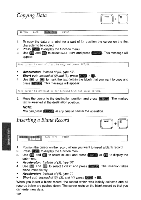
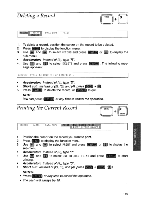
Creating and Editing a Merge File Entering Data Move the cursor to the desired label field, then type or correct the data. NOTES: • To correct, use (BACKSPACE , (CORRECT), (WORD OUT), and (CODE) + LINE OUT • To move the cursor within a label field, you can use E, n . However, when the cursor reaches the left or right border of a label field, it will automatically go to the previous or next label field. will also move the cursor to a new label field or move between existing fields. • Use tretYE) + NT1 (C)) to switch the insert mode on/off. • Use (CODE + LBACKSPACE) or the dead keys to superimpose characters (see "Superimposed Characters (Permanent Backspace)" on page 26) or to enter accented letter (see "Accents ("Dead" Keys)" on page 28). If necessary, use turn + Ks, (m) to switch the keyboard (see "Switching the Keyboard" on page 54). Creating a New Label When you start with a blank merge file, the screen displays only one label, Ml. After you,enter data into this label, press Ns to add a new empty label M2. The word processor will automatically add a new label each time you enter data in an empty label. Changing the Width of a Label CODE CODE 7 T SET 9 T CLR RECORD I ARFI I (IN ,E TINT RECORD LMDEL OFIUMIC, "LINT To make a label larger or shorter, proceed as follows: 1. Move the cursor to the label that you want to modify. 2. Press to display the function menu. 120
-
 1
1 -
2
-
3
-
4
-
5
-
6
-
7
-
8
-
9
-
10
-
11
-
12
-
13
-
14
-
15
-
16
-
17
-
18
-
19
-
20
-
21
-
22
-
23
-
24
-
25
-
26
-
27
-
28
-
29
-
30
-
31
-
32
-
33
-
34
-
35
-
36
-
37
-
38
-
39
-
40
-
41
-
42
-
43
-
44
-
45
-
46
-
47
-
48
-
49
-
50
-
51
-
52
-
53
-
54
-
55
-
56
-
57
-
58
-
59
-
60
-
61
-
62
-
63
-
64
-
65
-
66
-
67
-
68
-
69
-
70
-
71
-
72
-
73
-
74
-
75
-
76
-
77
-
78
-
79
-
80
-
81
-
82
-
83
-
84
-
85
-
86
-
87
-
88
-
89
-
90
-
91
-
92
-
93
-
94
-
95
-
96
-
97
-
98
-
99
-
100
-
101
-
102
-
103
-
104
-
105
-
106
-
107
-
108
-
109
-
110
-
111
-
112
-
113
-
114
-
115
-
116
-
117
-
118
-
119
-
120
-
121
-
122
-
 123
123 -
 124
124 -
 125
125 -
 126
126 -
 127
127 -
 128
128 -
 129
129 -
 130
130 -
 131
131 -
 132
132 -
 133
133 -
134
-
135
-
136
-
137
-
138
-
139
-
140
-
141
-
142
-
143
-
144
-
145
-
146
-
147
-
148
-
149
-
150
-
151
-
152
-
153
-
154
-
155
-
156
-
157
-
158
-
159
-
160
-
161
-
162
-
163
-
164
-
165
-
166
-
167
-
168
-
169
-
170
-
171
-
172
 |
 |
