D-Link DGS-1510-28P User Manual - Page 20
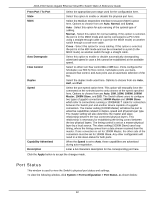
Port Status, System > Port Configuration > Port Status
 |
View all D-Link DGS-1510-28P manuals
Add to My Manuals
Save this manual to your list of manuals |
Page 20 highlights
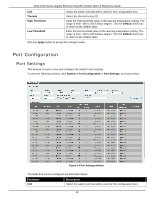
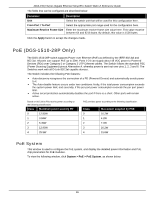
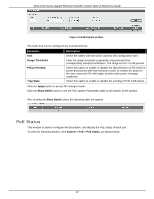
DGS-1510 Series Gigabit Ethernet SmartPro Switch Web UI Reference Guide From Port / To Port State MDIX Auto Downgrade Flow Control Duplex Speed Capability Advertised Description Select the appropriate port range used for the configuration here. Select this option to enable or disable the physical port here. Select the Medium Dependent Interface Crossover (MDIX) option here. Options to choose from are Auto, Normal, and Cross. Auto - Select this option for auto-sensing of the optimal type of cabling. Normal - Select this option for normal cabling. If this option is selected, the port is in the MDIX mode and can be connected to a PC's NIC using a straight-through cable or a port (in the MDIX mode) on another switch through a cross-over cable. Cross - Select this option for cross cabling. If this option is selected, the port is in the MDI mode and can be connected to a port (in the MDIX mode) on another switch through a straight cable. Select this option to enable or disable automatically downgrading advertised speed in case a link cannot be established at the available speed. Select to either turn flow control On or Off here. Ports configured for full-duplex use 802.3x flow control, half-duplex ports use backpressure flow control, and Auto ports use an automatic selection of the two. Select the duplex mode used here. Options to choose from are Auto, Half, and Full. Select the port speed option here. This option will manually force the connected on the selected port to only connect at the speed specified here. Options to choose from are Auto, 10M, 100M, 1000M, 1000M Master, 1000M Slave, and 10G. The Switch allows users to configure two types of gigabit connections; 1000M Master and 1000M Slave which refer to connections running a 1000BASE-T cable for connection between the Switch port and another device capable of a gigabit connection. The master setting (1000M Master) will allow the port to advertise capabilities related to duplex, speed and physical layer type. The master setting will also determine the master and slave relationship between the two connected physical layers. This relationship is necessary for establishing the timing control between the two physical layers. The timing control is set on a master physical layer by a local source. The slave setting (1000M Slave) uses loop timing, where the timing comes from a data stream received from the master. If one connection is set for 1000M Master, the other side of the connection must be set for 1000M Slave. Any other configuration will result in a link down status for both ports. When the Speed is set to Auto, these capabilities are advertised during auto-negotiation. Enter a 64 characters description for the corresponding port here. Click the Apply button to accept the changes made. Port Status This window is used to view the Switch's physical port status and settings. To view the following window, click System > Port Configuration > Port Status, as shown below: 12
-
 1
1 -
2
-
3
-
4
-
5
-
6
-
7
-
8
-
9
-
10
-
11
-
12
-
13
-
14
-
 15
15 -
 16
16 -
 17
17 -
 18
18 -
 19
19 -
 20
20 -
 21
21 -
 22
22 -
 23
23 -
 24
24 -
 25
25 -
26
-
27
-
28
-
29
-
30
-
31
-
32
-
33
-
34
-
35
-
36
-
37
-
38
-
39
-
40
-
41
-
42
-
43
-
44
-
45
-
46
-
47
-
48
-
49
-
50
-
51
-
52
-
53
-
54
-
55
-
56
-
57
-
58
-
59
-
60
-
61
-
62
-
63
-
64
-
65
-
66
-
67
-
68
-
69
-
70
-
71
-
72
-
73
-
74
-
75
-
76
-
77
-
78
-
79
-
80
-
81
-
82
-
83
-
84
-
85
-
86
-
87
-
88
-
89
-
90
-
91
-
92
-
93
-
94
-
95
-
96
-
97
-
98
-
99
-
100
-
101
-
102
-
103
-
104
-
105
-
106
-
107
-
108
-
109
-
110
-
111
-
112
-
113
-
114
-
115
-
116
-
117
-
118
-
119
-
120
-
121
-
122
-
123
-
124
-
125
-
126
-
127
-
128
-
129
-
130
-
131
-
132
-
133
-
134
-
135
-
136
-
137
-
138
-
139
-
140
-
141
-
142
-
143
-
144
-
145
-
146
-
147
-
148
-
149
-
150
-
151
-
152
-
153
-
154
-
155
-
156
-
157
-
158
-
159
-
160
-
161
-
162
-
163
-
164
-
165
-
166
-
167
-
168
-
169
-
170
-
171
-
172
-
173
-
174
-
175
-
176
-
177
-
178
-
179
-
180
-
181
-
182
-
183
-
184
-
185
-
186
-
187
-
188
-
189
-
190
-
191
-
192
-
193
-
194
-
195
-
196
-
197
-
198
-
199
-
200
-
201
-
202
-
203
-
204
-
205
-
206
-
207
-
208
-
209
-
210
-
211
-
212
-
213
-
214
-
215
-
216
-
217
-
218
-
219
-
220
-
221
-
222
-
223
-
224
-
225
-
226
-
227
-
228
-
229
-
230
-
231
-
232
-
233
-
234
-
235
-
236
-
237
-
238
-
239
-
240
-
241
-
242
-
243
-
244
-
245
-
246
-
247
-
248
-
249
-
250
-
251
-
252
-
253
-
254
-
255
-
256
-
257
-
258
-
259
-
260
-
261
-
262
-
263
-
264
-
265
-
266
-
267
-
268
-
269
-
270
-
271
-
272
-
273
-
274
-
275
-
276
-
277
-
278
-
279
-
280
-
281
-
282
-
283
-
284
-
285
-
286
-
287
-
288
-
289
-
290
-
291
-
292
-
293
-
294
-
295
-
296
-
297
-
298
-
299
-
300
-
301
-
302
-
303
-
304
-
305
-
306
-
307
-
308
-
309
-
310
-
311
-
312
-
313
-
314
-
315
-
316
-
317
-
318
-
319
-
320
-
321
-
322
-
323
-
324
-
325
-
326
-
327
-
328
-
329
-
330
-
331
-
332
-
333
-
334
-
335
-
336
-
337
-
338
-
339
-
340
-
341
-
342
-
343
-
344
-
345
-
346
-
347
-
348
-
349
-
350
-
351
-
352
-
353
-
354
-
355
-
356
-
357
-
358
-
359
-
360
-
361
-
362
-
363
-
364
-
365
-
366
-
367
-
368
-
369
-
370
-
371
-
372
-
373
-
374
-
375
-
376
-
377
-
378
-
379
-
380
-
381
-
382
-
383
-
384
-
385
-
386
-
387
-
388
-
389
-
390
-
391
-
392
-
393
-
394
-
395
-
396
-
397
-
398
-
399
-
400
-
401
-
402
-
403
-
404
-
405
-
406
-
407
-
408
-
409
-
410
-
411
-
412
-
413
-
414
-
415
-
416
-
417
-
418
-
419
-
420
-
421
-
422
-
423
-
424
-
425
-
426
-
427
-
428
-
429
-
430
 |
 |