D-Link DNS-1250-04 User Manual for DNS-1250-04 - Page 100
Tray Icon, Backup Now, ShareCenterNAVI
 |
View all D-Link DNS-1250-04 manuals
Add to My Manuals
Save this manual to your list of manuals |
Page 100 highlights
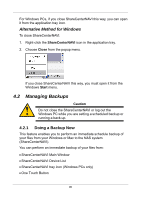
1. Go to the Main Window. 2. Right-click the system in the Device List whose backup you want to run. 3. Choose the Backup Now option. The backup begins immediately. Tray Icon Before you can do a backup from the ShareCenterNAVI tray icon, you must create a backup schedule and setup default NAS first. This feature applies to Windows PCs only. 1. Right-click the ShareCenterNAVI icon in the application tray. 2. Choose Backup Now in the popup menu. The backup begins immediately. The amount of time required depends on the size and number of files being backed up. The backed up files appear on the NAS system in ShareCenterNAVI in a folder named BACKUPDATA_your username. You can restore the backup files to your PC at any time. 92
-
 1
1 -
2
-
3
-
4
-
5
-
6
-
7
-
8
-
9
-
10
-
11
-
12
-
13
-
14
-
15
-
16
-
17
-
18
-
19
-
20
-
21
-
22
-
23
-
24
-
25
-
26
-
27
-
28
-
29
-
30
-
31
-
32
-
33
-
34
-
35
-
36
-
37
-
38
-
39
-
40
-
41
-
42
-
43
-
44
-
45
-
46
-
47
-
48
-
49
-
50
-
51
-
52
-
53
-
54
-
55
-
56
-
57
-
58
-
59
-
60
-
61
-
62
-
63
-
64
-
65
-
66
-
67
-
68
-
69
-
70
-
71
-
72
-
73
-
74
-
75
-
76
-
77
-
78
-
79
-
80
-
81
-
82
-
83
-
84
-
85
-
86
-
87
-
88
-
89
-
90
-
91
-
92
-
93
-
94
-
 95
95 -
 96
96 -
 97
97 -
 98
98 -
 99
99 -
 100
100 -
 101
101 -
 102
102 -
 103
103 -
 104
104 -
 105
105 -
106
-
107
-
108
-
109
-
110
-
111
-
112
-
113
-
114
-
115
-
116
-
117
-
118
-
119
-
120
-
121
-
122
-
123
-
124
 |
 |

1.
Go to the Main Window.
2.
Right-click the system in the Device List whose backup you want to
run.
3. Choose the
Backup Now
option.
The backup begins immediately.
Tray Icon
Before you can do a backup from the ShareCenterNAVI tray icon, you
must create a backup schedule and setup default NAS first. This feature
applies to Windows PCs only.
1. Right-click the
ShareCenterNAVI
icon in the application tray.
2. Choose
Backup Now
in the popup menu.
The backup begins immediately.
The amount of time required depends on the size and number of files
being backed up.
The backed up files appear on the NAS system in ShareCenterNAVI
in a folder named BACKUPDATA_your username.
You can restore the backup files to your PC at any time.
92