D-Link DNS-1250-04 User Manual for DNS-1250-04 - Page 110
Setting up a Share Folder for Time Machine, In ShareCenterNAVI
 |
View all D-Link DNS-1250-04 manuals
Add to My Manuals
Save this manual to your list of manuals |
Page 110 highlights
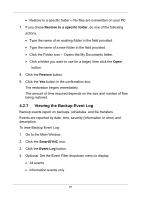
2. Click the Share Folder icon. 3. Click the Mount Share Folder button. 4. Click the share folder you want to un-mount or delete as a network drive. The folder name is highlighted. 5. Click the Un-Mount button. 6. Click the Yes button in the confirmation box. The share folder is un-mounted or disconnected but the link remains. 4.3.5 Setting up a Share Folder for Time Machine Time Machine is a backup utility included with Mac OS X 10.5 "Leopard" or higher. Before you begin, be sure your Mac is running and connected to the same network as the NAS system. In ShareCenterNAVI To set up a NAS system folder for Time Machine backups: 1. Go to the Main Window. 2. Click the Share Folder icon. 3. Click the Mount Share Folder button. 4. Click the share folder you want to use for Time Machine backups. 5. Check the Support TimeMachine box. 6. Click the Mount button. A message appears, "This folder has been set to a network drive." 102
-
 1
1 -
2
-
3
-
4
-
5
-
6
-
7
-
8
-
9
-
10
-
11
-
12
-
13
-
14
-
15
-
16
-
17
-
18
-
19
-
20
-
21
-
22
-
23
-
24
-
25
-
26
-
27
-
28
-
29
-
30
-
31
-
32
-
33
-
34
-
35
-
36
-
37
-
38
-
39
-
40
-
41
-
42
-
43
-
44
-
45
-
46
-
47
-
48
-
49
-
50
-
51
-
52
-
53
-
54
-
55
-
56
-
57
-
58
-
59
-
60
-
61
-
62
-
63
-
64
-
65
-
66
-
67
-
68
-
69
-
70
-
71
-
72
-
73
-
74
-
75
-
76
-
77
-
78
-
79
-
80
-
81
-
82
-
83
-
84
-
85
-
86
-
87
-
88
-
89
-
90
-
91
-
92
-
93
-
94
-
95
-
96
-
97
-
98
-
99
-
100
-
101
-
102
-
103
-
104
-
 105
105 -
 106
106 -
 107
107 -
 108
108 -
 109
109 -
 110
110 -
 111
111 -
 112
112 -
 113
113 -
 114
114 -
 115
115 -
116
-
117
-
118
-
119
-
120
-
121
-
122
-
123
-
124
 |
 |
