D-Link DNS-1250-04 User Manual for DNS-1250-04 - Page 86
Setting up Snapshot Backup, Changing Snapshot Backup Schedule Settings, Backup, Snapshot Backup
 |
View all D-Link DNS-1250-04 manuals
Add to My Manuals
Save this manual to your list of manuals |
Page 86 highlights
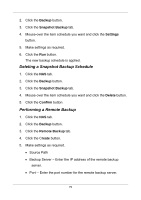
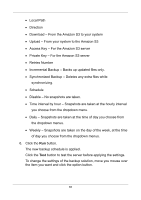
Amazon S3 Setting up Snapshot Backup 1. Click the NAS tab. 2. Click the Backup button. 3. Click the Snapshot Backup tab. 4. Click the Create button. 5. Make settings as required. Choose a Volume from the dropdown menu. From the Reserve Capacity for Snapshot dropdown menu, assign the reserved capacity for the backup solution. Check the Auto Extend box to enable this function. Choose a Snapshot schedule. Disable - No snapshots taken. Time interval by hour - Snapshots are taken at the hourly interval you choose from the dropdown menu. Daily - Snapshots are taken at the time of day you choose from the dropdown menus. Weekly - Snapshots are taken on the day of the week, at the time of day you choose from the dropdown menus. 6. Click the Run button. The new backup schedule is applied. Changing Snapshot Backup Schedule Settings 1. Click the NAS tab. 78
-
 1
1 -
2
-
3
-
4
-
5
-
6
-
7
-
8
-
9
-
10
-
11
-
12
-
13
-
14
-
15
-
16
-
17
-
18
-
19
-
20
-
21
-
22
-
23
-
24
-
25
-
26
-
27
-
28
-
29
-
30
-
31
-
32
-
33
-
34
-
35
-
36
-
37
-
38
-
39
-
40
-
41
-
42
-
43
-
44
-
45
-
46
-
47
-
48
-
49
-
50
-
51
-
52
-
53
-
54
-
55
-
56
-
57
-
58
-
59
-
60
-
61
-
62
-
63
-
64
-
65
-
66
-
67
-
68
-
69
-
70
-
71
-
72
-
73
-
74
-
75
-
76
-
77
-
78
-
79
-
80
-
 81
81 -
 82
82 -
 83
83 -
 84
84 -
 85
85 -
 86
86 -
 87
87 -
 88
88 -
 89
89 -
 90
90 -
 91
91 -
92
-
93
-
94
-
95
-
96
-
97
-
98
-
99
-
100
-
101
-
102
-
103
-
104
-
105
-
106
-
107
-
108
-
109
-
110
-
111
-
112
-
113
-
114
-
115
-
116
-
117
-
118
-
119
-
120
-
121
-
122
-
123
-
124
 |
 |