D-Link DNS-1250-04 User Manual for DNS-1250-04 - Page 101
Scheduling a Backup, SmartSYNC, Backup, Schedule
 |
View all D-Link DNS-1250-04 manuals
Add to My Manuals
Save this manual to your list of manuals |
Page 101 highlights
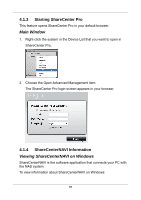
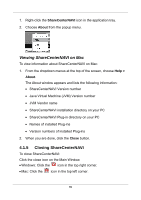
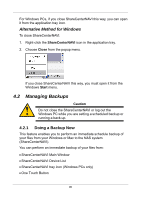
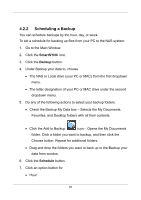
4.2.2 Scheduling a Backup You can schedule backups by the hour, day, or week. To set a schedule for backing up files from your PC to the NAS system: 1. Go to the Main Window. 2. Click the SmartSYNC icon. 3. Click the Backup button. 4. Under Backup your data to, choose The NAS or Local drive (your PC or MAC) from the first dropdown menu. The letter designation of your PC or MAC drive under the second dropdown menu. 5. Do any of the following actions to select your backup folders. Check the Backup My Data box - Selects the My Documents, Favorites, and Desktop folders with all their contents. Click the Add to Backup icon - Opens the My Documents folder. Click a folder you want to backup, and then click the Choose button. Repeat for additional folders. Drag and drop the folders you want to back up to the Backup your data from window. 6. Click the Schedule button. 7. Click an option button for Hour 93
-
 1
1 -
2
-
3
-
4
-
5
-
6
-
7
-
8
-
9
-
10
-
11
-
12
-
13
-
14
-
15
-
16
-
17
-
18
-
19
-
20
-
21
-
22
-
23
-
24
-
25
-
26
-
27
-
28
-
29
-
30
-
31
-
32
-
33
-
34
-
35
-
36
-
37
-
38
-
39
-
40
-
41
-
42
-
43
-
44
-
45
-
46
-
47
-
48
-
49
-
50
-
51
-
52
-
53
-
54
-
55
-
56
-
57
-
58
-
59
-
60
-
61
-
62
-
63
-
64
-
65
-
66
-
67
-
68
-
69
-
70
-
71
-
72
-
73
-
74
-
75
-
76
-
77
-
78
-
79
-
80
-
81
-
82
-
83
-
84
-
85
-
86
-
87
-
88
-
89
-
90
-
91
-
92
-
93
-
94
-
95
-
 96
96 -
 97
97 -
 98
98 -
 99
99 -
 100
100 -
 101
101 -
 102
102 -
 103
103 -
 104
104 -
 105
105 -
 106
106 -
107
-
108
-
109
-
110
-
111
-
112
-
113
-
114
-
115
-
116
-
117
-
118
-
119
-
120
-
121
-
122
-
123
-
124
 |
 |
