D-Link DNS-1250-04 User Manual for DNS-1250-04 - Page 18
Connecting the Ethernet Cable, 2.4 Connecting the Power, Caution
 |
View all D-Link DNS-1250-04 manuals
Add to My Manuals
Save this manual to your list of manuals |
Page 18 highlights
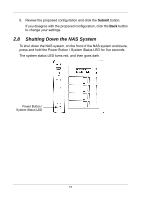
Drive carrier Physical drive Mounting screw Screwdriver 4. Reinstall the drive carrier into the enclosure. 5. Repeat steps 1 through 4 until all of your physical drives are installed. Caution To avoid hand contact with an electrical hazard, remove only one drive carrier a time. 2.3 Connecting the Ethernet Cable To connect the NAS system to your network: 1. Attach one end of the network cable to an RJ45 network connector. RJ45 Network Connectors (2) 2. Attach the other end of the network cable to your Ethernet hub or switch. 2.4 Connecting the Power To connect and power up the NAS system: 1. Attach the power cord on the back of the enclosure. 2. Plug the other end into your power source. 10
-
 1
1 -
2
-
3
-
4
-
5
-
6
-
7
-
8
-
9
-
10
-
11
-
12
-
 13
13 -
 14
14 -
 15
15 -
 16
16 -
 17
17 -
 18
18 -
 19
19 -
 20
20 -
 21
21 -
 22
22 -
 23
23 -
24
-
25
-
26
-
27
-
28
-
29
-
30
-
31
-
32
-
33
-
34
-
35
-
36
-
37
-
38
-
39
-
40
-
41
-
42
-
43
-
44
-
45
-
46
-
47
-
48
-
49
-
50
-
51
-
52
-
53
-
54
-
55
-
56
-
57
-
58
-
59
-
60
-
61
-
62
-
63
-
64
-
65
-
66
-
67
-
68
-
69
-
70
-
71
-
72
-
73
-
74
-
75
-
76
-
77
-
78
-
79
-
80
-
81
-
82
-
83
-
84
-
85
-
86
-
87
-
88
-
89
-
90
-
91
-
92
-
93
-
94
-
95
-
96
-
97
-
98
-
99
-
100
-
101
-
102
-
103
-
104
-
105
-
106
-
107
-
108
-
109
-
110
-
111
-
112
-
113
-
114
-
115
-
116
-
117
-
118
-
119
-
120
-
121
-
122
-
123
-
124
 |
 |

Drive carrier
Physical
drive
Screwdriver
Mounting screw
4.
Reinstall the drive carrier into the enclosure.
5.
Repeat steps 1 through 4 until all of your physical drives are installed.
Caution
To avoid hand contact with an electrical hazard, remove
only one drive carrier a time.
2.3
Connecting the Ethernet Cable
To connect the NAS system to your network:
1.
Attach one end of the network cable to an RJ45 network connector.
RJ45 Network
Connectors (2)
2.
Attach the other end of the network cable to your Ethernet hub or
switch.
2.4
Connecting the Power
To connect and power up the NAS system:
1.
Attach the power cord on the back of the enclosure.
10
2.
Plug the other end into your power source.