D-Link DNS-1250-04 User Manual for DNS-1250-04 - Page 104
Restoring Backed-up Files, SmartSYNC, Schedule List, Delete, BACKUPDATA_your, username, Caution
 |
View all D-Link DNS-1250-04 manuals
Add to My Manuals
Save this manual to your list of manuals |
Page 104 highlights
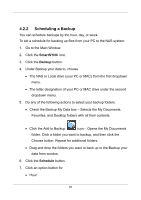
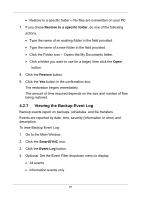
2. Click the SmartSYNC icon. 3. Click the Schedule List button. 4. Click the schedule you want to delete. 5. Click the Delete button. 6. Click the Yes button in the confirmation box. 4.2.6 Restoring Backed-up Files You can restore all or any portion of the files in the BACKUPDATA_your username folder on the NAS system. You can choose to restore the files to their original location or an alternative location. The original file structure is maintained during backup and restoration. Caution If you restore to the original folders on your PC, the restore function will overwrite the files in those folders. Be careful which files you restore and where on your PC you direct the backup files. To restore your backed-up files from the NAS system to your PC: 1. Go to the Main Window. 2. Click the SmartSYNC icon. 3. Click the Restore button. 4. Click the folder whose contents you want to restore. 5. Click the arrow icons to expand the tree and narrow your choices. 6. Click an option button. Restore to original folder -- The backup files overwrite the files on your PC 96
-
 1
1 -
2
-
3
-
4
-
5
-
6
-
7
-
8
-
9
-
10
-
11
-
12
-
13
-
14
-
15
-
16
-
17
-
18
-
19
-
20
-
21
-
22
-
23
-
24
-
25
-
26
-
27
-
28
-
29
-
30
-
31
-
32
-
33
-
34
-
35
-
36
-
37
-
38
-
39
-
40
-
41
-
42
-
43
-
44
-
45
-
46
-
47
-
48
-
49
-
50
-
51
-
52
-
53
-
54
-
55
-
56
-
57
-
58
-
59
-
60
-
61
-
62
-
63
-
64
-
65
-
66
-
67
-
68
-
69
-
70
-
71
-
72
-
73
-
74
-
75
-
76
-
77
-
78
-
79
-
80
-
81
-
82
-
83
-
84
-
85
-
86
-
87
-
88
-
89
-
90
-
91
-
92
-
93
-
94
-
95
-
96
-
97
-
98
-
 99
99 -
 100
100 -
 101
101 -
 102
102 -
 103
103 -
 104
104 -
 105
105 -
 106
106 -
 107
107 -
 108
108 -
 109
109 -
110
-
111
-
112
-
113
-
114
-
115
-
116
-
117
-
118
-
119
-
120
-
121
-
122
-
123
-
124
 |
 |
