D-Link DNS-1250-04 User Manual for DNS-1250-04 - Page 82
Changing Folder Settings, Setting up Folder Sharing, Submit, File Sharing, Share, Setting
 |
View all D-Link DNS-1250-04 manuals
Add to My Manuals
Save this manual to your list of manuals |
Page 82 highlights
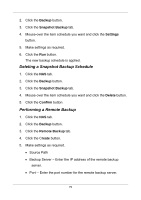
6. In the Permission Setting field, set the privilege for the users to access the folder and click the Next button. Deny-Access, Read-Only, or Read-Write 7. Click the Submit button. Changing Folder Settings 1. Click the NAS tab. 2. Click the File Sharing button. 3. In the File Sharing list, mouse-over the folder and click the Share Setting button. 4. Make settings changes as required. Windows/Mac/FTP/WebDAV - Select the Protocol for your networking configuration, and set up the Permission Setting for each user/group. UNIX/LINUX - Add the IP address in the New IP Address box then click the Add button for sharing. Enter *.*.*.* if all IP addresses are allowed to share. 5. Click the Save button. Setting up Folder Sharing 1. Click the NAS tab. 2. Click the File Sharing button. 3. In the File Sharing list, mouse-over the folder and click the Share Setting button. 4. Make settings as required. Windows (CIFS) 74
-
 1
1 -
2
-
3
-
4
-
5
-
6
-
7
-
8
-
9
-
10
-
11
-
12
-
13
-
14
-
15
-
16
-
17
-
18
-
19
-
20
-
21
-
22
-
23
-
24
-
25
-
26
-
27
-
28
-
29
-
30
-
31
-
32
-
33
-
34
-
35
-
36
-
37
-
38
-
39
-
40
-
41
-
42
-
43
-
44
-
45
-
46
-
47
-
48
-
49
-
50
-
51
-
52
-
53
-
54
-
55
-
56
-
57
-
58
-
59
-
60
-
61
-
62
-
63
-
64
-
65
-
66
-
67
-
68
-
69
-
70
-
71
-
72
-
73
-
74
-
75
-
76
-
 77
77 -
 78
78 -
 79
79 -
 80
80 -
 81
81 -
 82
82 -
 83
83 -
 84
84 -
 85
85 -
 86
86 -
 87
87 -
88
-
89
-
90
-
91
-
92
-
93
-
94
-
95
-
96
-
97
-
98
-
99
-
100
-
101
-
102
-
103
-
104
-
105
-
106
-
107
-
108
-
109
-
110
-
111
-
112
-
113
-
114
-
115
-
116
-
117
-
118
-
119
-
120
-
121
-
122
-
123
-
124
 |
 |
