Dell A960 All In One Personal Printer User's Guide - Page 14
Select Fax Mode Menu Items, From this sub, You can, Options
 |
View all Dell A960 All In One Personal Printer manuals
Add to My Manuals
Save this manual to your list of manuals |
Page 14 highlights
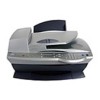
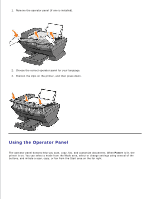
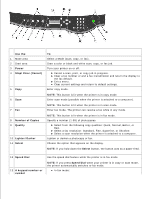
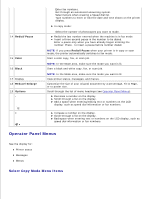
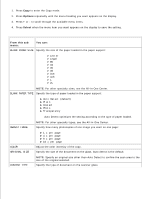
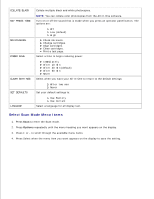
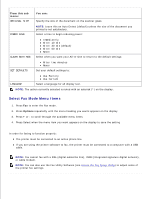
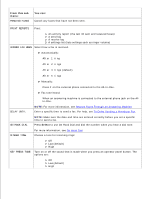
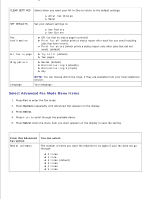
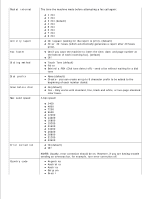
From this sub menu: ORIGINAL SIZE You can: Specify the size of the document on the scanner glass. POWER SAVE NOTE: Leave this on Auto Detect (default) unless the size of the document you printed is not satisfactory. Select a time to begin reducing power: CLEAR SETTINGS Immediately After 10 min After 30 min (default) After 60 min Never Select when you want your All-In-One to return to the default settings: SET DEFAULTS After two minutes Never Set your default settings to: LANGUAGE Use Factory Use Current Select a language for all display text. NOTE: The option currently selected is noted with an asterisk (*) on the display. Select Fax Mode Menu Items 1. Press Fax to enter the Fax mode. 2. Press Options repeatedly until the menu heading you wants appears on the display. 3. Press + or - to scroll through the available menu items. 4. Press Select when the menu item you want appears on the display to save the setting In order for faxing to function properly: The printer must be connected to an active phone line. If you are using the printer software to fax, the printer must be connected to a computer with a USB cable. NOTE: You cannot fax with a DSL (digital subscribe line), ISDN (integrated signature digital network), or cable modem. NOTE: You can also use the Fax Utility Software (see Access the Fax Setup Utility) to adjust some of the printer fax settings.
-
 1
1 -
2
-
3
-
4
-
5
-
6
-
7
-
8
-
 9
9 -
 10
10 -
 11
11 -
 12
12 -
 13
13 -
 14
14 -
 15
15 -
 16
16 -
 17
17 -
 18
18 -
 19
19 -
20
-
21
-
22
-
23
-
24
-
25
-
26
-
27
-
28
-
29
-
30
-
31
-
32
-
33
-
34
-
35
-
36
-
37
-
38
-
39
-
40
-
41
-
42
-
43
-
44
-
45
-
46
-
47
-
48
-
49
-
50
-
51
-
52
-
53
-
54
-
55
-
56
-
57
-
58
-
59
-
60
-
61
-
62
-
63
-
64
-
65
-
66
-
67
-
68
-
69
-
70
-
71
-
72
-
73
-
74
-
75
-
76
-
77
-
78
-
79
-
80
-
81
-
82
-
83
-
84
-
85
-
86
-
87
-
88
-
89
-
90
-
91
-
92
-
93
-
94
-
95
 |
 |