Dell A960 All In One Personal Printer User's Guide - Page 46
Print Faxes Using Dell Printer Fax Tools Fax Software, Print to Fax, Options, Select, Con
 |
View all Dell A960 All In One Personal Printer manuals
Add to My Manuals
Save this manual to your list of manuals |
Page 46 highlights
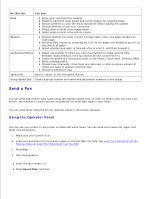
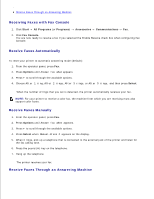
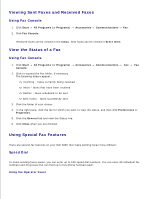
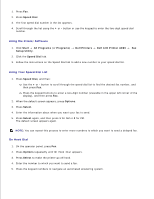
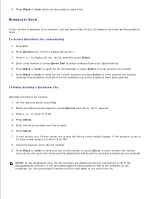
1. From the operator panel, press Fax. 2. Press Options until Answer fax when appears. 3. Press + to scroll through the available options. 4. When Fax Tone Heard appears on the display, press Select. When a ring is detected, the answering machine picks up the call. If a fax is detected, the printer receives the fax, and disconnects the answering machine. If not, the answering machine completes the call. Print Faxes Using Dell Printer Fax Tools Fax Software 1. From the main Fax Tools screen, click Configure. 2. Select General Setup. 3. Select the Fax tab. 4. Click the Print received faxes check box, and then click OK. Incoming faxes automatically go to the printer as they are received. NOTE: To view all received faxes, click the Fax Inbox button. Click the Fax Outbox button to view a list of sent faxes. Print to Fax The Print to fax feature eliminates the need to print an original document and put it on the scanner glass to send a fax the conventional way. You can create or receive a soft copy document on your computer and send a black and white fax of it to someone else. NOTE: You cannot receive soft copy faxes, only send them. All incoming faxes will print from your printer. To send a fax from your computer program using the fax modem in your printer: 1. With your document open, click File Print. 2. In the printer list, select Dell Printer Fax Tools. 3. Click Print. 4. To Print to fax, follow the instructions in the program that launches. NOTE: All faxes sent using the Print to fax feature use the Fine resolution.
-
 1
1 -
2
-
3
-
4
-
5
-
6
-
7
-
8
-
9
-
10
-
11
-
12
-
13
-
14
-
15
-
16
-
17
-
18
-
19
-
20
-
21
-
22
-
23
-
24
-
25
-
26
-
27
-
28
-
29
-
30
-
31
-
32
-
33
-
34
-
35
-
36
-
37
-
38
-
39
-
40
-
 41
41 -
 42
42 -
 43
43 -
 44
44 -
 45
45 -
 46
46 -
 47
47 -
 48
48 -
 49
49 -
 50
50 -
 51
51 -
52
-
53
-
54
-
55
-
56
-
57
-
58
-
59
-
60
-
61
-
62
-
63
-
64
-
65
-
66
-
67
-
68
-
69
-
70
-
71
-
72
-
73
-
74
-
75
-
76
-
77
-
78
-
79
-
80
-
81
-
82
-
83
-
84
-
85
-
86
-
87
-
88
-
89
-
90
-
91
-
92
-
93
-
94
-
95
 |
 |