Dell A960 All In One Personal Printer User's Guide - Page 45
Receiving Faxes with Fax Console, Receive Faxes Automatically
 |
View all Dell A960 All In One Personal Printer manuals
Add to My Manuals
Save this manual to your list of manuals |
Page 45 highlights
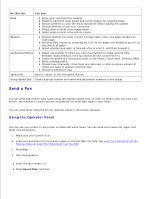
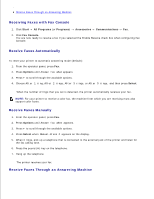
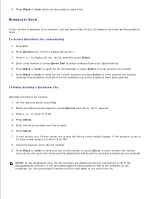
Receive Faxes Through an Answering Machine Receiving Faxes with Fax Console 1. Click Start All Programs (or Programs) Accessories Communications Fax. 2. Click Fax Console. You are now ready to receive a fax if you selected the Enable Receive check box when configuring Fax Console. Receive Faxes Automatically To reset your printer to automatic answering mode (default): 1. From the operator panel, press Fax. 2. Press Options until Answer fax when appears. 3. Press + to scroll through the available options. 4. Choose After 1 ring, After 2 rings, After 3 rings, or After 5 rings, and then press Select. When the number of rings that you set is detected, the printer automatically receives your fax. NOTE: For your printer to receive a color fax, the machine from which you are receiving must also support color faxes. Receive Faxes Manually 1. From the operator panel, press Fax. 2. Press Options until Answer fax when appears. 3. Press + to scroll through the available options. 4. Press Select when Manual-Press # appears on the display. 5. When it rings, pick up a telephone that is connected to the external jack of the printer and listen for the fax calling tone. 6. Press the pound (#) key on the telephone. 7. Hang up the telephone. The printer receives your fax. Receive Faxes Through an Answering Machine 1. 2.
-
 1
1 -
2
-
3
-
4
-
5
-
6
-
7
-
8
-
9
-
10
-
11
-
12
-
13
-
14
-
15
-
16
-
17
-
18
-
19
-
20
-
21
-
22
-
23
-
24
-
25
-
26
-
27
-
28
-
29
-
30
-
31
-
32
-
33
-
34
-
35
-
36
-
37
-
38
-
39
-
 40
40 -
 41
41 -
 42
42 -
 43
43 -
 44
44 -
 45
45 -
 46
46 -
 47
47 -
 48
48 -
 49
49 -
 50
50 -
51
-
52
-
53
-
54
-
55
-
56
-
57
-
58
-
59
-
60
-
61
-
62
-
63
-
64
-
65
-
66
-
67
-
68
-
69
-
70
-
71
-
72
-
73
-
74
-
75
-
76
-
77
-
78
-
79
-
80
-
81
-
82
-
83
-
84
-
85
-
86
-
87
-
88
-
89
-
90
-
91
-
92
-
93
-
94
-
95
 |
 |