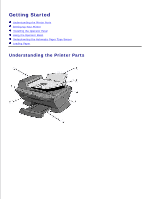
Dell A960 All In One Personal Printer User's Guide - Page 8
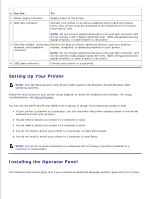
Setting Up Your Printer, Installing the Operator Panel - personal all in one printer software
 |
View all Dell A960 All In One Personal Printer manuals
Add to My Manuals
Save this manual to your list of manuals |
Page 8 highlights
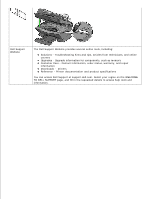
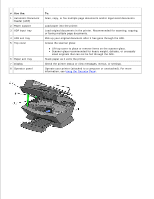
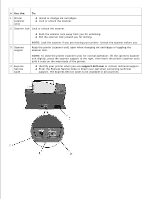
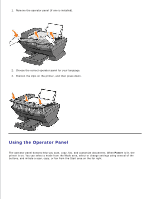
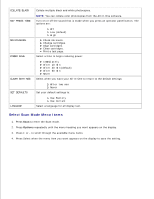
# Use the: 1 Power supply connector 2 Wall jack connector To: Supply power to the printer. Connect your printer to an active telephone line to send and receive faxes. Your printer must be connected to this telephone line to receive incoming fax calls. NOTE: Do not connect additional devices to the wall jack connector and do not connect a DSL (digital subscriber line), ISDN (integrated services digital network), or cable modem to the printer. 3 Data/fax modem, answering Remove the plug to connect additional devices, such as a data/fax machine, and telephone modem, telephone, or answering machine to your printer. connector NOTE: Do not connect additional devices to the wall jack connector, and do not connect a DSL (digital subscriber line), ISDN (integrated services digital network), or cable modem to the printer. 4 USB cable connector Connect your printer to a computer. Setting Up Your Printer NOTE: The Dell Personal All-In-One Printer A960 supports the Windows XP and Windows 2000 operating systems. Follow the instructions on your printer Setup Diagram to install the hardware and software. For setup troubleshooting, see Setup Problems. You can use the Dell™ AIO Printer A960 to do a variety of things. A few important things to note: If your printer is attached to a computer, you can use either the printer operator panel or the printer software to create your projects. You do need to attach your printer to a computer to scan. You do need to attach your printer to a computer to print. You do not need to attach your printer to a computer to make photocopies. You do not need to attach your printer to a computer to send faxes. NOTE: The printer must be connected to a telephone line for faxing to function (attached to a computer or unattached). Installing the Operator Panel The following instructions apply only if you received an additional language operator panel with your printer. 1.
-
 1
1 -
2
-
 3
3 -
 4
4 -
 5
5 -
 6
6 -
 7
7 -
 8
8 -
 9
9 -
 10
10 -
 11
11 -
 12
12 -
 13
13 -
14
-
15
-
16
-
17
-
18
-
19
-
20
-
21
-
22
-
23
-
24
-
25
-
26
-
27
-
28
-
29
-
30
-
31
-
32
-
33
-
34
-
35
-
36
-
37
-
38
-
39
-
40
-
41
-
42
-
43
-
44
-
45
-
46
-
47
-
48
-
49
-
50
-
51
-
52
-
53
-
54
-
55
-
56
-
57
-
58
-
59
-
60
-
61
-
62
-
63
-
64
-
65
-
66
-
67
-
68
-
69
-
70
-
71
-
72
-
73
-
74
-
75
-
76
-
77
-
78
-
79
-
80
-
81
-
82
-
83
-
84
-
85
-
86
-
87
-
88
-
89
-
90
-
91
-
92
-
93
-
94
-
95
 |
 |