Dell PowerConnect W-IAP92 Dell Instant 6.1.2.3-2.0.0.0 User Guide - Page 130
IP Address, Version, v1, v2c, v3, Community/Username, Inform, SNMP Trap Receivers, for SNMPV3 traps.
 |
View all Dell PowerConnect W-IAP92 manuals
Add to My Manuals
Save this manual to your list of manuals |
Page 130 highlights
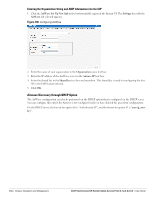
2. Click New and update the following fields: 1. IP Address: Enter the IP Address of the new SNMP Trap receiver. 2. Version: Select the SNMP version-v1, v2c, v3 from the drop-down list. The version specifies the format of traps generated by the access point. 3. Community/Username: Specify the community string for SNMPV1 and SNMPV2c traps and a username for SNMPV3 traps. 4. Port: Enter the port to which the traps are sent. The default value is 162. 5. Inform: When enabled, traps are sent as SNMP INFORM messages. It is applicable to SNMPV3 only. The default value is Yes. 3. Click OK to view the trap receiver information in the SNMP Trap Receivers window. NOTE: Dell PowerConnect W-Series-specific management information bases (MIBs) describe the objects that can be managed using SNMP. See the Dell PowerConnect W-Series Instant Access Point MIB Reference Guide for information about the Dell PowerConnect W-Series and Aruba MIBs and SNMP traps. 130 | SNMP Dell PowerConnect W-Series Instant Access Point 6.1.2.3-2.0.0.0 | User Guide
-
 1
1 -
2
-
3
-
4
-
5
-
6
-
7
-
8
-
9
-
10
-
11
-
12
-
13
-
14
-
15
-
16
-
17
-
18
-
19
-
20
-
21
-
22
-
23
-
24
-
25
-
26
-
27
-
28
-
29
-
30
-
31
-
32
-
33
-
34
-
35
-
36
-
37
-
38
-
39
-
40
-
41
-
42
-
43
-
44
-
45
-
46
-
47
-
48
-
49
-
50
-
51
-
52
-
53
-
54
-
55
-
56
-
57
-
58
-
59
-
60
-
61
-
62
-
63
-
64
-
65
-
66
-
67
-
68
-
69
-
70
-
71
-
72
-
73
-
74
-
75
-
76
-
77
-
78
-
79
-
80
-
81
-
82
-
83
-
84
-
85
-
86
-
87
-
88
-
89
-
90
-
91
-
92
-
93
-
94
-
95
-
96
-
97
-
98
-
99
-
100
-
101
-
102
-
103
-
104
-
105
-
106
-
107
-
108
-
109
-
110
-
111
-
112
-
113
-
114
-
115
-
116
-
117
-
118
-
119
-
120
-
121
-
122
-
123
-
124
-
 125
125 -
 126
126 -
 127
127 -
 128
128 -
 129
129 -
 130
130 -
 131
131 -
 132
132 -
 133
133 -
 134
134 -
 135
135 -
136
-
137
-
138
-
139
-
140
-
141
-
142
-
143
-
144
-
145
-
146
-
147
-
148
-
149
-
150
-
151
-
152
-
153
-
154
-
155
-
156
-
157
-
158
 |
 |