Dell PowerConnect W-IAP92 Dell Instant 6.1.2.3-2.0.0.0 User Guide - Page 85
Captive Portal, Internal Captive Portal
 |
View all Dell PowerConnect W-IAP92 manuals
Add to My Manuals
Save this manual to your list of manuals |
Page 85 highlights
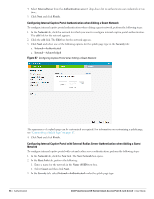
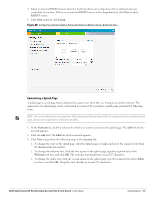
Captive Portal Dell Instant network supports captive portal authentication method for a Guest network type. In this method, a web page is displayed to a guest user who tries to access the internet. The user has to authenticate or accept company's network usage policy in the web page. Two types of captive portal authentication are supported on Dell Instant: Internal Captive Portal External Captive Portal Internal Captive Portal In the Internal Captive Portal type, an internal server is used to host the captive portal service. Internal captive portal authentication is classified as follows: Internal Authenticated-To gain access to the wireless network, a user must authenticate in the captive portal page. If this option is selected, then users who are required to authenticate have to be added to the user database. Click the Users link to add the users. For information about adding users, see "Adding a User" on page 151. Internal Acknowledged-To gain access to the wireless network, a user must accept the terms and conditions. Configuring Internal Captive Portal Authentication when Adding a Guest Network To configure internal captive portal authentication when adding a guest network, perform the following steps: 1. In the Network tab, click the New link. The New Network box opens. 2. In the Basic Info tab, perform the following: 1. Enter a name for the network in the Name (SSID) text box. 2. Click Guest and click Next. 3. In the Security tab, select one of the following options for the splash page type: a. Internal-Authenticated b. Internal-Acknowledged Figure 66 Configuring Captive Portal when Adding A Guest Network The appearance of a splash page can be customized as required. For information on customizing a splash page, see "Customizing a Splash Page" on page 87. Dell PowerConnect W-Series Instant Access Point 6.1.2.3-2.0.0.0 | User Guide Authentication | 85
-
 1
1 -
2
-
3
-
4
-
5
-
6
-
7
-
8
-
9
-
10
-
11
-
12
-
13
-
14
-
15
-
16
-
17
-
18
-
19
-
20
-
21
-
22
-
23
-
24
-
25
-
26
-
27
-
28
-
29
-
30
-
31
-
32
-
33
-
34
-
35
-
36
-
37
-
38
-
39
-
40
-
41
-
42
-
43
-
44
-
45
-
46
-
47
-
48
-
49
-
50
-
51
-
52
-
53
-
54
-
55
-
56
-
57
-
58
-
59
-
60
-
61
-
62
-
63
-
64
-
65
-
66
-
67
-
68
-
69
-
70
-
71
-
72
-
73
-
74
-
75
-
76
-
77
-
78
-
79
-
 80
80 -
 81
81 -
 82
82 -
 83
83 -
 84
84 -
 85
85 -
 86
86 -
 87
87 -
 88
88 -
 89
89 -
 90
90 -
91
-
92
-
93
-
94
-
95
-
96
-
97
-
98
-
99
-
100
-
101
-
102
-
103
-
104
-
105
-
106
-
107
-
108
-
109
-
110
-
111
-
112
-
113
-
114
-
115
-
116
-
117
-
118
-
119
-
120
-
121
-
122
-
123
-
124
-
125
-
126
-
127
-
128
-
129
-
130
-
131
-
132
-
133
-
134
-
135
-
136
-
137
-
138
-
139
-
140
-
141
-
142
-
143
-
144
-
145
-
146
-
147
-
148
-
149
-
150
-
151
-
152
-
153
-
154
-
155
-
156
-
157
-
158
 |
 |