Dell PowerConnect W-IAP92 Dell Instant 6.1.3.1-3.0.0.0 User Guide - Page 113
Loading Certificates using Dell PowrConnect W-AirWave,
 |
View all Dell PowerConnect W-IAP92 manuals
Add to My Manuals
Save this manual to your list of manuals |
Page 113 highlights
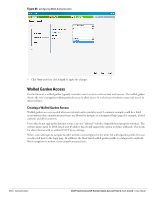
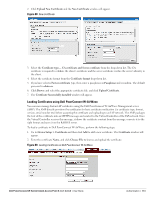
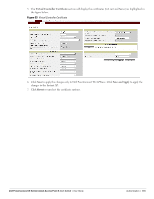
2. Click Upload New Certificate and the New Certificate window will appear. Figure 88 New Certificate 3. Select the Certificate type- CA certificate and Server certificate from the drop-down list. The CA certificate is required to validate the client's certificate and the server certificate verifies the server's identity to the client. 4. Select the certificate format from the Certificate format drop-down list. 5. If you have selected Server certificate type, then enter a passphrase in Passphrase and reconfirm. The default password is whatever. 6. Click Browse and select the appropriate certificate file, and click Upload Certificate. 7. The Certificate Successfully Installed window will appear. Loading Certificates using Dell PowrConnect W-AirWave You can now manage Instant AP certificates using the Dell PowrConnect W-AirWave Management server (AMP). The AMP directly provision the certificates for basic certificate verification (i.e certificate type, format, version, serial number etc) before accepting the certificate and uploading to an IAP network. The AMP packages the text of the certificate into an HTTPS message and sends it to the Virtual Controller of the IAP network. Once the Virtual Controller receives this message, it draws the certificate content from the message, converts it to the right format and saves it on the RADIUS server. To load a certificate in Dell PowrConnect W-AirWave, perform the following steps: 1. Go to Device Setup > Certificate and then click Add to add a new certificate. The Certificate window will appear. 2. Enter the certificate Name, and click Choose File to browse and upload the certificate. Figure 89 Loading Certificate via Dell PowrConnect W-AirWave Dell PowerConnect W-Series Instant Access Point 6.1.3.1-3.0.0.0 | User Guide Authentication | 113
-
 1
1 -
2
-
3
-
4
-
5
-
6
-
7
-
8
-
9
-
10
-
11
-
12
-
13
-
14
-
15
-
16
-
17
-
18
-
19
-
20
-
21
-
22
-
23
-
24
-
25
-
26
-
27
-
28
-
29
-
30
-
31
-
32
-
33
-
34
-
35
-
36
-
37
-
38
-
39
-
40
-
41
-
42
-
43
-
44
-
45
-
46
-
47
-
48
-
49
-
50
-
51
-
52
-
53
-
54
-
55
-
56
-
57
-
58
-
59
-
60
-
61
-
62
-
63
-
64
-
65
-
66
-
67
-
68
-
69
-
70
-
71
-
72
-
73
-
74
-
75
-
76
-
77
-
78
-
79
-
80
-
81
-
82
-
83
-
84
-
85
-
86
-
87
-
88
-
89
-
90
-
91
-
92
-
93
-
94
-
95
-
96
-
97
-
98
-
99
-
100
-
101
-
102
-
103
-
104
-
105
-
106
-
107
-
 108
108 -
 109
109 -
 110
110 -
 111
111 -
 112
112 -
 113
113 -
 114
114 -
 115
115 -
 116
116 -
 117
117 -
 118
118 -
119
-
120
-
121
-
122
-
123
-
124
-
125
-
126
-
127
-
128
-
129
-
130
-
131
-
132
-
133
-
134
-
135
-
136
-
137
-
138
-
139
-
140
-
141
-
142
-
143
-
144
-
145
-
146
-
147
-
148
-
149
-
150
-
151
-
152
-
153
-
154
-
155
-
156
-
157
-
158
-
159
-
160
-
161
-
162
-
163
-
164
-
165
-
166
-
167
-
168
-
169
-
170
-
171
-
172
-
173
-
174
-
175
-
176
-
177
-
178
-
179
-
180
-
181
-
182
-
183
-
184
-
185
-
186
-
187
-
188
-
189
-
190
-
191
-
192
-
193
-
194
-
195
-
196
-
197
-
198
-
199
-
200
-
201
-
202
-
203
-
204
-
205
-
206
-
207
-
208
-
209
-
210
-
211
-
212
-
213
-
214
 |
 |
