Dell PowerConnect W-IAP92 Dell Instant 6.1.3.1-3.0.0.0 User Guide - Page 44
Adding an Employee Network, Basic Info
 |
View all Dell PowerConnect W-IAP92 manuals
Add to My Manuals
Save this manual to your list of manuals |
Page 44 highlights
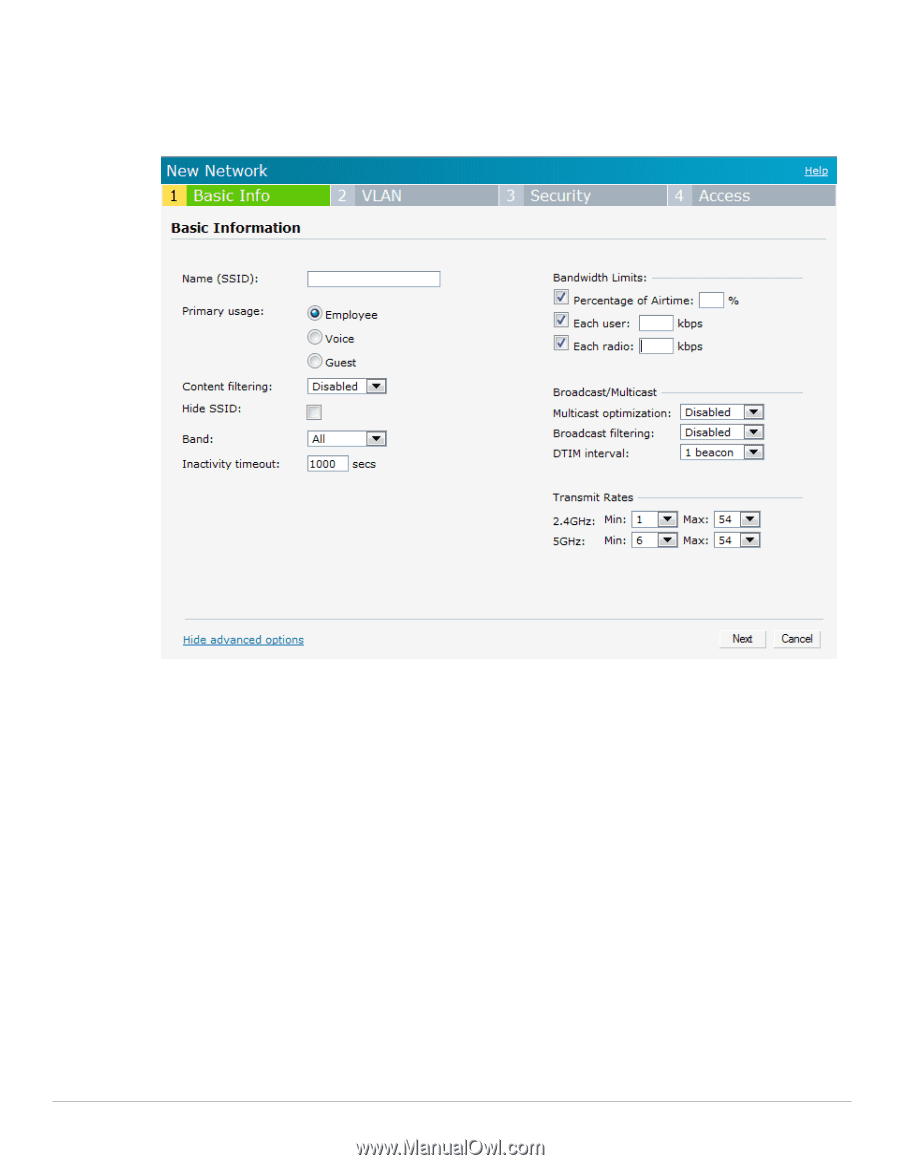
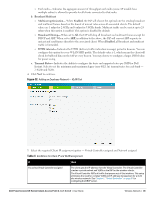
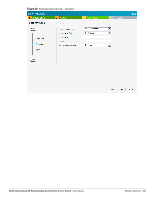
Adding an Employee Network This section provides the procedure to add an employee network. 1. In the Networks tab, click the New link. The New Network window appears. Figure 31 Adding an Employee Network - Basic Info Tab 2. In the Basic Info tab, perform the following steps: a. Name (SSID)- Enter a name that uniquely identifies a wireless network. b. Primary usage- Select Employee (this is selected by default) from the Primary usage options. This selection determines whether the network is primarily intended to be used for employee data, guest data, or voice traffic. c. Content filtering- When enabled, all DNS requests to non-corporate domains on this wireless network are sent to OpenDNS. d. Hide SSID- Select this check box if you do not want the SSID (network name) to be visible to users. e. Band- Set the band at which the network will transmit radio signals. Available options are 2.4 GHz, 5 GHz and All. The All option is selected by default. It is also the recommended option. f. Inactivity timeout- Indicates the time in seconds after which an idle client ages out. The minimum value is 60 seconds and the default value is 1000 seconds. 3. Click the Show advanced options link and perform the following steps. a. Bandwidth Limits- You can specify three types of bandwidth limits. Percentage of Airtime- Indicates the aggregate amount of airtime that all clients on this Network can use to send/receive data. Each user- Indicates the throughput for any single user on this Network. The throughput value is specified in kbps. 44 | Wireless Network Dell PowerConnect W-Series Instant Access Point 6.1.3.1-3.0.0.0 | User Guide
-
 1
1 -
2
-
3
-
4
-
5
-
6
-
7
-
8
-
9
-
10
-
11
-
12
-
13
-
14
-
15
-
16
-
17
-
18
-
19
-
20
-
21
-
22
-
23
-
24
-
25
-
26
-
27
-
28
-
29
-
30
-
31
-
32
-
33
-
34
-
35
-
36
-
37
-
38
-
 39
39 -
 40
40 -
 41
41 -
 42
42 -
 43
43 -
 44
44 -
 45
45 -
 46
46 -
 47
47 -
 48
48 -
 49
49 -
50
-
51
-
52
-
53
-
54
-
55
-
56
-
57
-
58
-
59
-
60
-
61
-
62
-
63
-
64
-
65
-
66
-
67
-
68
-
69
-
70
-
71
-
72
-
73
-
74
-
75
-
76
-
77
-
78
-
79
-
80
-
81
-
82
-
83
-
84
-
85
-
86
-
87
-
88
-
89
-
90
-
91
-
92
-
93
-
94
-
95
-
96
-
97
-
98
-
99
-
100
-
101
-
102
-
103
-
104
-
105
-
106
-
107
-
108
-
109
-
110
-
111
-
112
-
113
-
114
-
115
-
116
-
117
-
118
-
119
-
120
-
121
-
122
-
123
-
124
-
125
-
126
-
127
-
128
-
129
-
130
-
131
-
132
-
133
-
134
-
135
-
136
-
137
-
138
-
139
-
140
-
141
-
142
-
143
-
144
-
145
-
146
-
147
-
148
-
149
-
150
-
151
-
152
-
153
-
154
-
155
-
156
-
157
-
158
-
159
-
160
-
161
-
162
-
163
-
164
-
165
-
166
-
167
-
168
-
169
-
170
-
171
-
172
-
173
-
174
-
175
-
176
-
177
-
178
-
179
-
180
-
181
-
182
-
183
-
184
-
185
-
186
-
187
-
188
-
189
-
190
-
191
-
192
-
193
-
194
-
195
-
196
-
197
-
198
-
199
-
200
-
201
-
202
-
203
-
204
-
205
-
206
-
207
-
208
-
209
-
210
-
211
-
212
-
213
-
214
 |
 |