Dell PowerConnect W-IAP92 Dell Instant 6.1.3.1-3.0.0.0 User Guide - Page 57
Conditions for Adding a Voice Network- Security Tab Continued
 |
View all Dell PowerConnect W-IAP92 manuals
Add to My Manuals
Save this manual to your list of manuals |
Page 57 highlights
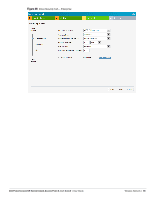
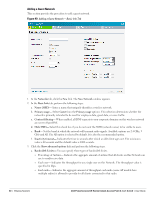
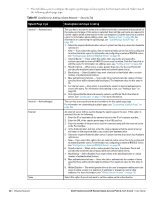
Table 8 Conditions for Adding a Voice Network- Security Tab (Continued) If then, You want to use the default security level, Personal Perform the following steps: 1. Select the required key options from the Key management drop-down list. Available options are: WPA-2 Personal WPA Personal Both (WPA-2 & WPA) Static WEP If you have selected Static WEP, then do the following: Select appropriate WEP key size from the WEP key size drop-down list. Available options are 64-bit and 128-bit. Select appropriate Tx key from the Tx Key drop-down list. Available options are 1, 2, 3,and 4. Enter an appropriate WEP key and reconfirm. For more information on encryption and recommended encryption type, see Chapter 9, "Encryption" . 2. Select a passphrase format from the Passphrase format drop-down list. Available options are: 8-63 alphanumeric chars 64 hexadecimal chars 3. Enter a passphrase in the Passphrase text box and reconfirm. 4. Select the required option from the MAC authentication drop-down list. Available options are: Enabled and Disabled When Enabled, user must configure at least one RADIUS server for authentication server. See "MAC Authentication" on page 109 for further details. 5. Authentication server 1- Select the required Authentication server option from the drop-down list. Available options are: New- If you select this option, then an external radius server has to be configured to authenticate the users. For information on configuring an external RADIUS server, see Chapter 8, "Authentication" . InternalServer- If you select this option, then users who are required to authenticate with the internal RADIUS server must be added. Click the Users link to add the users. For information on adding a user, see "Adding a User" on page 203. 6. Reauth interval- When set to a value greater than zero, the Access Points will periodically reauthenticate all associated and authenticated clients. 7. Blacklisting- Select Enabled if you want clients to be blacklisted after a certain number of authentication failures. 8. Max authentication failures- Users who fail to authenticate the number of times specified here will be dynamically blacklisted. The maximum value for this entry is 10. NOTE: Navigate to PEF > Blacklisting in the WebUI to specify the duration of the blacklisting on the Blacklisting tab of the PEF window. NOTE: Navigate to PEF > Blacklisting in the WebUI to specify the duration of the blacklisting on the Blacklisting tab of the PEF window. 9. For Internal users- Click Users to populate the system's internal authentication server with users. For information about adding a user, see "Adding a User" on page 203. 10. Click Upload Certificate and browse to upload a certificate file for the internal server. See "Certificates" on page 111 for more information. Dell PowerConnect W-Series Instant Access Point 6.1.3.1-3.0.0.0 | User Guide Wireless Network | 57
-
 1
1 -
2
-
3
-
4
-
5
-
6
-
7
-
8
-
9
-
10
-
11
-
12
-
13
-
14
-
15
-
16
-
17
-
18
-
19
-
20
-
21
-
22
-
23
-
24
-
25
-
26
-
27
-
28
-
29
-
30
-
31
-
32
-
33
-
34
-
35
-
36
-
37
-
38
-
39
-
40
-
41
-
42
-
43
-
44
-
45
-
46
-
47
-
48
-
49
-
50
-
51
-
 52
52 -
 53
53 -
 54
54 -
 55
55 -
 56
56 -
 57
57 -
 58
58 -
 59
59 -
 60
60 -
 61
61 -
 62
62 -
63
-
64
-
65
-
66
-
67
-
68
-
69
-
70
-
71
-
72
-
73
-
74
-
75
-
76
-
77
-
78
-
79
-
80
-
81
-
82
-
83
-
84
-
85
-
86
-
87
-
88
-
89
-
90
-
91
-
92
-
93
-
94
-
95
-
96
-
97
-
98
-
99
-
100
-
101
-
102
-
103
-
104
-
105
-
106
-
107
-
108
-
109
-
110
-
111
-
112
-
113
-
114
-
115
-
116
-
117
-
118
-
119
-
120
-
121
-
122
-
123
-
124
-
125
-
126
-
127
-
128
-
129
-
130
-
131
-
132
-
133
-
134
-
135
-
136
-
137
-
138
-
139
-
140
-
141
-
142
-
143
-
144
-
145
-
146
-
147
-
148
-
149
-
150
-
151
-
152
-
153
-
154
-
155
-
156
-
157
-
158
-
159
-
160
-
161
-
162
-
163
-
164
-
165
-
166
-
167
-
168
-
169
-
170
-
171
-
172
-
173
-
174
-
175
-
176
-
177
-
178
-
179
-
180
-
181
-
182
-
183
-
184
-
185
-
186
-
187
-
188
-
189
-
190
-
191
-
192
-
193
-
194
-
195
-
196
-
197
-
198
-
199
-
200
-
201
-
202
-
203
-
204
-
205
-
206
-
207
-
208
-
209
-
210
-
211
-
212
-
213
-
214
 |
 |
