Epson 9600 Service Manual - Page 176
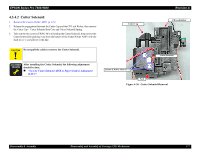
See Cutter Solenoid ASSY or Paper Guide L Adjustment, p.217
 |
UPC - 010343841888
View all Epson 9600 manuals
Add to My Manuals
Save this manual to your list of manuals |
Page 176 highlights
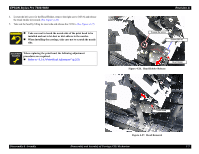
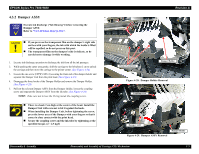
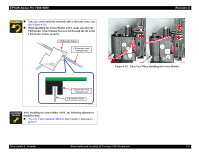
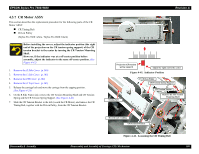
EPSON Stylus Pro 7600/9600 „ Take care not to catch the solenoid cable (red) in the cutter cap. (See Figure 4-35) „ When installing the Cutter Holder ASSY, make sure that the CR Encoder Scale (Timing Fence) is led through the slit in the CR Encoder Sensor properly. CR Encoder Sensor CR Encoder Scale (Timing Fence) Revision A Figure 4-35. Take Care When Installing the Cutter Holder CR Encoder Scale (Timing Fence) CR Encoder Sensor A D JU S TM E N T R E Q U IR E D After installing the cutter holder ASSY, the following adjustment should be done. „ "5.1.4.11 Cutter Solenoid ASSY or Paper Guide L Adjustment (p.217)" Disassembly & Assembly Disassembly and Assembly of Carriage (CR) Mechanism 176
-
 1
1 -
2
-
3
-
4
-
5
-
6
-
7
-
8
-
9
-
10
-
11
-
12
-
13
-
14
-
15
-
16
-
17
-
18
-
19
-
20
-
21
-
22
-
23
-
24
-
25
-
26
-
27
-
28
-
29
-
30
-
31
-
32
-
33
-
34
-
35
-
36
-
37
-
38
-
39
-
40
-
41
-
42
-
43
-
44
-
45
-
46
-
47
-
48
-
49
-
50
-
51
-
52
-
53
-
54
-
55
-
56
-
57
-
58
-
59
-
60
-
61
-
62
-
63
-
64
-
65
-
66
-
67
-
68
-
69
-
70
-
71
-
72
-
73
-
74
-
75
-
76
-
77
-
78
-
79
-
80
-
81
-
82
-
83
-
84
-
85
-
86
-
87
-
88
-
89
-
90
-
91
-
92
-
93
-
94
-
95
-
96
-
97
-
98
-
99
-
100
-
101
-
102
-
103
-
104
-
105
-
106
-
107
-
108
-
109
-
110
-
111
-
112
-
113
-
114
-
115
-
116
-
117
-
118
-
119
-
120
-
121
-
122
-
123
-
124
-
125
-
126
-
127
-
128
-
129
-
130
-
131
-
132
-
133
-
134
-
135
-
136
-
137
-
138
-
139
-
140
-
141
-
142
-
143
-
144
-
145
-
146
-
147
-
148
-
149
-
150
-
151
-
152
-
153
-
154
-
155
-
156
-
157
-
158
-
159
-
160
-
161
-
162
-
163
-
164
-
165
-
166
-
167
-
168
-
169
-
170
-
 171
171 -
 172
172 -
 173
173 -
 174
174 -
 175
175 -
 176
176 -
 177
177 -
 178
178 -
 179
179 -
 180
180 -
 181
181 -
182
-
183
-
184
-
185
-
186
-
187
-
188
-
189
-
190
-
191
-
192
-
193
-
194
-
195
-
196
-
197
-
198
-
199
-
200
-
201
-
202
-
203
-
204
-
205
-
206
-
207
-
208
-
209
-
210
-
211
-
212
-
213
-
214
-
215
-
216
-
217
-
218
-
219
-
220
-
221
-
222
-
223
-
224
-
225
-
226
-
227
-
228
-
229
-
230
-
231
-
232
-
233
-
234
-
235
-
236
-
237
-
238
-
239
-
240
-
241
-
242
-
243
-
244
-
245
-
246
-
247
-
248
-
249
-
250
-
251
-
252
-
253
-
254
-
255
-
256
-
257
-
258
-
259
-
260
-
261
-
262
-
263
-
264
-
265
-
266
-
267
-
268
-
269
-
270
-
271
-
272
-
273
-
274
-
275
-
276
-
277
-
278
-
279
-
280
-
281
-
282
-
283
-
284
-
285
-
286
-
287
-
288
-
289
-
290
-
291
-
292
-
293
-
294
-
295
-
296
-
297
-
298
-
299
-
300
-
301
-
302
-
303
-
304
-
305
-
306
-
307
-
308
-
309
-
310
-
311
-
312
-
313
-
314
-
315
-
316
-
317
-
318
-
319
-
320
-
321
-
322
-
323
-
324
-
325
-
326
-
327
-
328
-
329
-
330
-
331
-
332
-
333
-
334
-
335
-
336
 |
 |

EPSON Stylus Pro 7600/9600
Revision A
Disassembly & Assembly
Disassembly and Assembly of Carriage (CR) Mechanism
176
Figure 4-35.
Take Care When Installing the Cutter Holder
Take care not to catch the solenoid cable (red) in the cutter cap.
(See Figure 4-35)
When installing the Cutter Holder ASSY, make sure that the
CR Encoder Scale (Timing Fence) is led through the slit in the
CR Encoder Sensor properly.
A
D
J
U
S
T
M
E
N
T
R
E
Q
U
I
R
E
D
After installing the cutter holder ASSY, the following adjustment
should be done.
“5.1.4.11 Cutter Solenoid ASSY or Paper Guide L Adjustment
(p.217)”
CR Encoder Sensor
CR Encoder Scale
(Timing Fence)
CR Encoder Sensor
CR Encoder Scale
(Timing Fence)