Epson 9600 Service Manual - Page 35
SelecType - black line
 |
UPC - 010343841888
View all Epson 9600 manuals
Add to My Manuals
Save this manual to your list of manuals |
Page 35 highlights
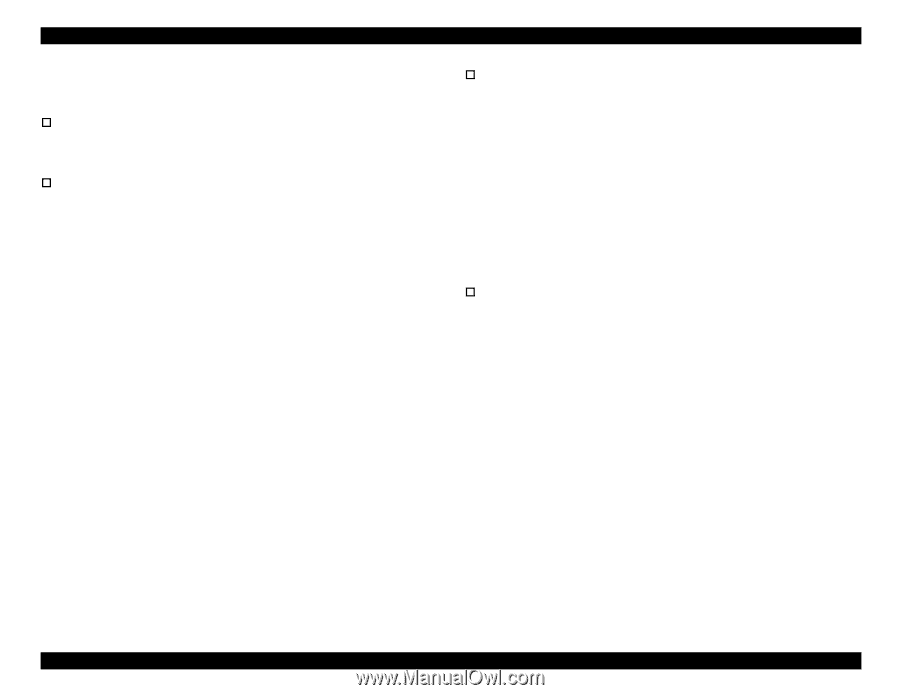
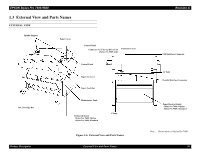
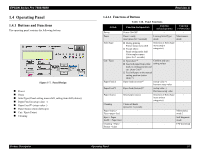
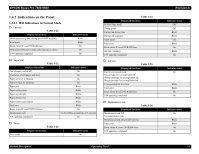
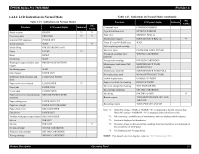
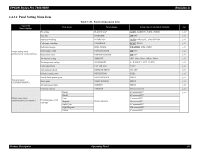
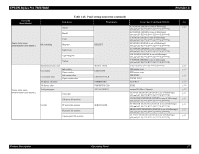
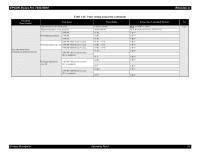
EPSON Stylus Pro 7600/9600 Revision A 1.4.3 SelecType 1.4.3.1 Outline † Startup The SelecType mode is selected by pressing the SelecType button during print ready, warning, or maintenance call status. The printer is then automatically incapable of printing. † Operation 1. The Printer setting menu can be entered by pushing the SelecType button during menu shift available state (Print ready, no paper). It is shifted to setting menu select mode, and the setting menu is displayed on the left side of the LCD upper line. 2. Each setting menu is displayed one after another by pressing Paper Feed ∆∇ buttons in the setting menu select mode. It is shifted to setting item select menu by pressing the SelecType button. [Setting menu] is displayed on the upper line, and [Setting item] is displayed on the lower line. 3. The setting menu is displayed one after another by pressing Paper Feed ∆∇ buttons in the setting item select mode. It is shifted to setting value select mode of the setting item by pressing the SelecType button. [Setting item] is displayed on the upper line, and [Setting value] is displayed on the lower line. The '*' represents the current setup value. 4. Setting value is displayed on the lower line one after another by pressing Paper Feed ∆∇ buttons in the setting value select mode if the setting value can be changed. The '*' represents the current setup value. 5. When the Enter button is pressed in the setting value select mode, the displayed setting value is entered as the current setting value. If it has a corresponded operation, it is started. No operation occurs if '*' is already displayed. 6. It returns to the setting item select menu by pressing the Paper Source button in the setting value select mode. It returns to the setting menu select mode by pressing the Paper Source button in the setting item select menu. † Termination • The printer enters the menu shift available status when the Pause button is pressed in the SelecType mode. • The printer enters the menu shift available status when the Paper source button is pushed once in setting menu select mode. • The printer enters the menu shift available status when setting initialization is executed. • The printer enters the print ready status after the nozzle check pattern or the status sheet is printed. • The printer enters the menu shift available status after black ink is replaced. • The printer enters the menu shift available status after the cutter is replaced. • The printer returns to the menu shift available status when Pause button is pressed in any modes. NOTE: Under the special condition, it sometimes can not return to the status. † Panel display Character strings on the second line in the following list are displayed on the second line of LCD panel. Setup values are displayed on the second line of LCD panel. Product Description Operating Panel 35
-
 1
1 -
2
-
3
-
4
-
5
-
6
-
7
-
8
-
9
-
10
-
11
-
12
-
13
-
14
-
15
-
16
-
17
-
18
-
19
-
20
-
21
-
22
-
23
-
24
-
25
-
26
-
27
-
28
-
29
-
 30
30 -
 31
31 -
 32
32 -
 33
33 -
 34
34 -
 35
35 -
 36
36 -
 37
37 -
 38
38 -
 39
39 -
 40
40 -
41
-
42
-
43
-
44
-
45
-
46
-
47
-
48
-
49
-
50
-
51
-
52
-
53
-
54
-
55
-
56
-
57
-
58
-
59
-
60
-
61
-
62
-
63
-
64
-
65
-
66
-
67
-
68
-
69
-
70
-
71
-
72
-
73
-
74
-
75
-
76
-
77
-
78
-
79
-
80
-
81
-
82
-
83
-
84
-
85
-
86
-
87
-
88
-
89
-
90
-
91
-
92
-
93
-
94
-
95
-
96
-
97
-
98
-
99
-
100
-
101
-
102
-
103
-
104
-
105
-
106
-
107
-
108
-
109
-
110
-
111
-
112
-
113
-
114
-
115
-
116
-
117
-
118
-
119
-
120
-
121
-
122
-
123
-
124
-
125
-
126
-
127
-
128
-
129
-
130
-
131
-
132
-
133
-
134
-
135
-
136
-
137
-
138
-
139
-
140
-
141
-
142
-
143
-
144
-
145
-
146
-
147
-
148
-
149
-
150
-
151
-
152
-
153
-
154
-
155
-
156
-
157
-
158
-
159
-
160
-
161
-
162
-
163
-
164
-
165
-
166
-
167
-
168
-
169
-
170
-
171
-
172
-
173
-
174
-
175
-
176
-
177
-
178
-
179
-
180
-
181
-
182
-
183
-
184
-
185
-
186
-
187
-
188
-
189
-
190
-
191
-
192
-
193
-
194
-
195
-
196
-
197
-
198
-
199
-
200
-
201
-
202
-
203
-
204
-
205
-
206
-
207
-
208
-
209
-
210
-
211
-
212
-
213
-
214
-
215
-
216
-
217
-
218
-
219
-
220
-
221
-
222
-
223
-
224
-
225
-
226
-
227
-
228
-
229
-
230
-
231
-
232
-
233
-
234
-
235
-
236
-
237
-
238
-
239
-
240
-
241
-
242
-
243
-
244
-
245
-
246
-
247
-
248
-
249
-
250
-
251
-
252
-
253
-
254
-
255
-
256
-
257
-
258
-
259
-
260
-
261
-
262
-
263
-
264
-
265
-
266
-
267
-
268
-
269
-
270
-
271
-
272
-
273
-
274
-
275
-
276
-
277
-
278
-
279
-
280
-
281
-
282
-
283
-
284
-
285
-
286
-
287
-
288
-
289
-
290
-
291
-
292
-
293
-
294
-
295
-
296
-
297
-
298
-
299
-
300
-
301
-
302
-
303
-
304
-
305
-
306
-
307
-
308
-
309
-
310
-
311
-
312
-
313
-
314
-
315
-
316
-
317
-
318
-
319
-
320
-
321
-
322
-
323
-
324
-
325
-
326
-
327
-
328
-
329
-
330
-
331
-
332
-
333
-
334
-
335
-
336
 |
 |