Epson 9600 Service Manual - Page 245
Platen Position Checking
 |
UPC - 010343841888
View all Epson 9600 manuals
Add to My Manuals
Save this manual to your list of manuals |
Page 245 highlights
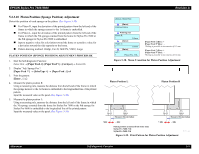
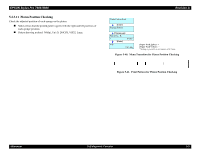
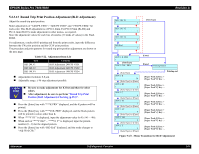
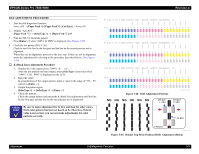
EPSON Stylus Pro 7600/9600 5.2.3.11 Platen Position Checking Check the adjusted position of each sponge on the platen. „ Make certain that the printed pattern agrees with the right and left positions of each sponge position. „ Pattern drawing method: 360dpi, Uni-D, 240CPS, VSD2, Large Revision A [Enter] Adjust Print [Enter] Printing Pattern Printing end Platen Pos. R: ? 0.0mm [Enter] Adj : Cut Adj. [Paper Feed ∆]Key: + [Paper Feed ∇]Key : - *Setting is possible in increments of 0.1 mm. Figure 5-40. Menu Transition for Platen Position Checking Figure 5-41. Print Pattern for Platen Position Checking Adjustment Self-diagnostic Function 245
-
 1
1 -
2
-
3
-
4
-
5
-
6
-
7
-
8
-
9
-
10
-
11
-
12
-
13
-
14
-
15
-
16
-
17
-
18
-
19
-
20
-
21
-
22
-
23
-
24
-
25
-
26
-
27
-
28
-
29
-
30
-
31
-
32
-
33
-
34
-
35
-
36
-
37
-
38
-
39
-
40
-
41
-
42
-
43
-
44
-
45
-
46
-
47
-
48
-
49
-
50
-
51
-
52
-
53
-
54
-
55
-
56
-
57
-
58
-
59
-
60
-
61
-
62
-
63
-
64
-
65
-
66
-
67
-
68
-
69
-
70
-
71
-
72
-
73
-
74
-
75
-
76
-
77
-
78
-
79
-
80
-
81
-
82
-
83
-
84
-
85
-
86
-
87
-
88
-
89
-
90
-
91
-
92
-
93
-
94
-
95
-
96
-
97
-
98
-
99
-
100
-
101
-
102
-
103
-
104
-
105
-
106
-
107
-
108
-
109
-
110
-
111
-
112
-
113
-
114
-
115
-
116
-
117
-
118
-
119
-
120
-
121
-
122
-
123
-
124
-
125
-
126
-
127
-
128
-
129
-
130
-
131
-
132
-
133
-
134
-
135
-
136
-
137
-
138
-
139
-
140
-
141
-
142
-
143
-
144
-
145
-
146
-
147
-
148
-
149
-
150
-
151
-
152
-
153
-
154
-
155
-
156
-
157
-
158
-
159
-
160
-
161
-
162
-
163
-
164
-
165
-
166
-
167
-
168
-
169
-
170
-
171
-
172
-
173
-
174
-
175
-
176
-
177
-
178
-
179
-
180
-
181
-
182
-
183
-
184
-
185
-
186
-
187
-
188
-
189
-
190
-
191
-
192
-
193
-
194
-
195
-
196
-
197
-
198
-
199
-
200
-
201
-
202
-
203
-
204
-
205
-
206
-
207
-
208
-
209
-
210
-
211
-
212
-
213
-
214
-
215
-
216
-
217
-
218
-
219
-
220
-
221
-
222
-
223
-
224
-
225
-
226
-
227
-
228
-
229
-
230
-
231
-
232
-
233
-
234
-
235
-
236
-
237
-
238
-
239
-
 240
240 -
 241
241 -
 242
242 -
 243
243 -
 244
244 -
 245
245 -
 246
246 -
 247
247 -
 248
248 -
 249
249 -
 250
250 -
251
-
252
-
253
-
254
-
255
-
256
-
257
-
258
-
259
-
260
-
261
-
262
-
263
-
264
-
265
-
266
-
267
-
268
-
269
-
270
-
271
-
272
-
273
-
274
-
275
-
276
-
277
-
278
-
279
-
280
-
281
-
282
-
283
-
284
-
285
-
286
-
287
-
288
-
289
-
290
-
291
-
292
-
293
-
294
-
295
-
296
-
297
-
298
-
299
-
300
-
301
-
302
-
303
-
304
-
305
-
306
-
307
-
308
-
309
-
310
-
311
-
312
-
313
-
314
-
315
-
316
-
317
-
318
-
319
-
320
-
321
-
322
-
323
-
324
-
325
-
326
-
327
-
328
-
329
-
330
-
331
-
332
-
333
-
334
-
335
-
336
 |
 |
EPSON Stylus Pro 7600/9600
Revision A
Adjustment
Self-diagnostic Function
245
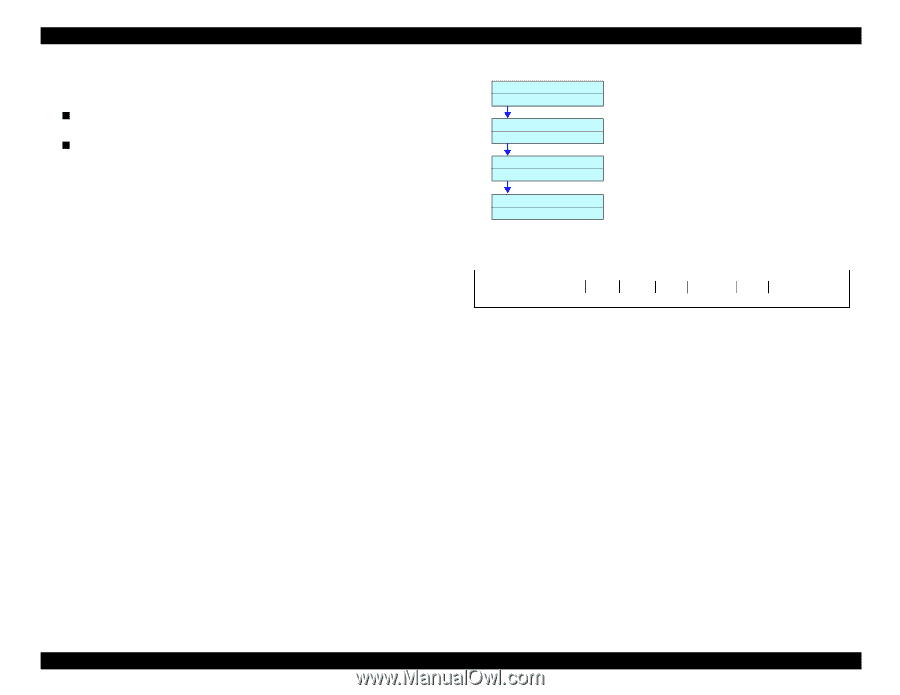
5.2.3.11
Platen Position Checking
Check the adjusted position of each sponge on the platen.
Make certain that the printed pattern agrees with the right and left positions of
each sponge position.
Pattern drawing method: 360dpi, Uni-D, 240CPS, VSD2, Large
Figure 5-40.
Menu Transition for Platen Position Checking
Figure 5-41.
Print Pattern for Platen Position Checking
[Enter] Adjust Print
Printing Pattern
Platen Pos.
R:
?
0.0mm
Adj :
Cut Adj.
[Enter]
[Paper Feed
∆
]Key: +
[Paper Feed
∇
]Key : –
*Setting is possible in increments of 0.1 mm.
Printing end
[Enter]