Epson PowerLite 8150i Administrator's Manual - Page 47
Configuring the Projector to the Network, Determining How Your Network is Set Up
 |
View all Epson PowerLite 8150i manuals
Add to My Manuals
Save this manual to your list of manuals |
Page 47 highlights
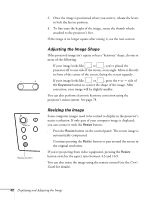
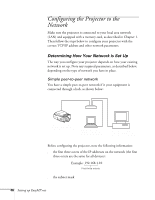
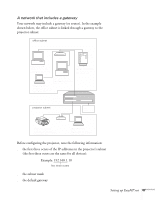
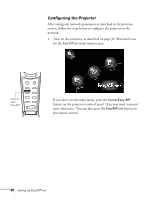
Configuring the Projector to the Network Make sure the projector is connected to your local area network (LAN) and equipped with a memory card, as described in Chapter 1. Then follow the steps below to configure your projector with the correct TCP/IP address and other network parameters. Determining How Your Network is Set Up The way you configure your projector depends on how your existing network is set up. Note any required parameters, as described below, depending on the type of network you have in place. Simple peer-to-peer network You have a simple peer-to-peer network if it your equipment is connected through a hub, as shown below: Hub Projector name : EasyMP.net IP Address : 192. 168. 1. 1 Subnet Mask : 255. 255. 255.0 Default Gateway : x. x. x. x Computer name : PC5 IP Address : 192. 168. 1.5 Subnet Mask : 255. 255. 255.0 Default Gateway : x. x. x. x Computer name : PC10 IP Address : 192. 168. 1. 10 Subnet Mask : 255. 255. 255.0 Default Gateway : x. x. x. x Before configuring the projector, note the following information: s the first three octets of the IP addresses on the network (the first three octets are the same for all devices): Example: 192.168.1.10 first three octets s the subnet mask 46 Setting up EasyMP.net
-
 1
1 -
2
-
3
-
4
-
5
-
6
-
7
-
8
-
9
-
10
-
11
-
12
-
13
-
14
-
15
-
16
-
17
-
18
-
19
-
20
-
21
-
22
-
23
-
24
-
25
-
26
-
27
-
28
-
29
-
30
-
31
-
32
-
33
-
34
-
35
-
36
-
37
-
38
-
39
-
40
-
41
-
 42
42 -
 43
43 -
 44
44 -
 45
45 -
 46
46 -
 47
47 -
 48
48 -
 49
49 -
 50
50 -
 51
51 -
 52
52 -
53
-
54
-
55
-
56
-
57
-
58
-
59
-
60
-
61
-
62
-
63
-
64
-
65
-
66
-
67
-
68
-
69
-
70
-
71
-
72
-
73
-
74
-
75
-
76
-
77
-
78
-
79
-
80
-
81
-
82
-
83
-
84
-
85
-
86
-
87
-
88
-
89
-
90
-
91
-
92
-
93
-
94
-
95
-
96
-
97
-
98
-
99
-
100
-
101
-
102
-
103
-
104
-
105
-
106
-
107
-
108
-
109
-
110
-
111
-
112
-
113
-
114
-
115
-
116
-
117
-
118
-
119
-
120
-
121
-
122
-
123
-
124
-
125
-
126
-
127
-
128
-
129
-
130
-
131
-
132
-
133
-
134
-
135
 |
 |