Epson PowerLite 8150i Administrator's Manual - Page 55
Registering Projector Names in an .INI File
 |
View all Epson PowerLite 8150i manuals
Add to My Manuals
Save this manual to your list of manuals |
Page 55 highlights
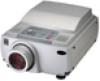
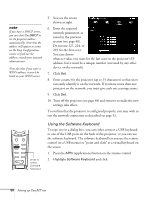
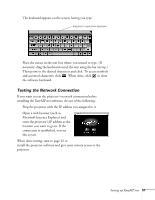
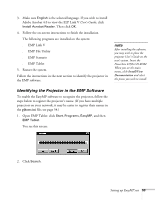
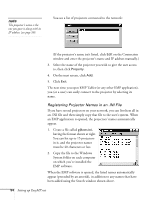
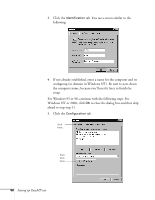
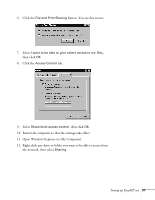
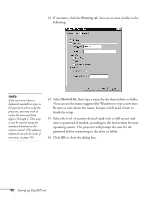
note The projector's name is the one you gave it along with its IP address (see page 50). You see a list of projectors connected to the network: (If the projector's name isn't listed, click Edit on the Connection window and enter the projector's name and IP address manually.) 3. Select the name of the projector you wish to give the user access to, then click Property. 4. On the next screen, click Add. 5. Click Exit. The next time you open EMP Tablet (or any other EMP application), you (or a user) can easily connect to the projector by selecting its name. Registering Projector Names in an .INI File If you have several projectors on your network, you can list them all in an .INI file and then simply copy that file to the user's system. When an EMP application is opened, the projectors' names automatically appear. 1. Create a file called pjhosts.ini, having the format shown at right. You can list up to 15 projectors in it, and the projector names must be 40 characters or less. 2. Copy the file to the Windows System folder on each computer on which you've installed the EMP software. When the EMP software is opened, the listed names automatically appear (preceded by an asterisk), in addition to any names that have been added using the Search window shown above. 54 Setting up EasyMP.net
-
 1
1 -
2
-
3
-
4
-
5
-
6
-
7
-
8
-
9
-
10
-
11
-
12
-
13
-
14
-
15
-
16
-
17
-
18
-
19
-
20
-
21
-
22
-
23
-
24
-
25
-
26
-
27
-
28
-
29
-
30
-
31
-
32
-
33
-
34
-
35
-
36
-
37
-
38
-
39
-
40
-
41
-
42
-
43
-
44
-
45
-
46
-
47
-
48
-
49
-
 50
50 -
 51
51 -
 52
52 -
 53
53 -
 54
54 -
 55
55 -
 56
56 -
 57
57 -
 58
58 -
 59
59 -
 60
60 -
61
-
62
-
63
-
64
-
65
-
66
-
67
-
68
-
69
-
70
-
71
-
72
-
73
-
74
-
75
-
76
-
77
-
78
-
79
-
80
-
81
-
82
-
83
-
84
-
85
-
86
-
87
-
88
-
89
-
90
-
91
-
92
-
93
-
94
-
95
-
96
-
97
-
98
-
99
-
100
-
101
-
102
-
103
-
104
-
105
-
106
-
107
-
108
-
109
-
110
-
111
-
112
-
113
-
114
-
115
-
116
-
117
-
118
-
119
-
120
-
121
-
122
-
123
-
124
-
125
-
126
-
127
-
128
-
129
-
130
-
131
-
132
-
133
-
134
-
135
 |
 |