Epson PowerLite 8150i Administrator's Manual - Page 57
For Windows 95 or 98, continue with the following steps. For, Windows NT or 2000, click
 |
View all Epson PowerLite 8150i manuals
Add to My Manuals
Save this manual to your list of manuals |
Page 57 highlights
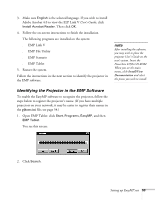
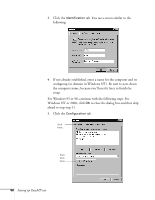
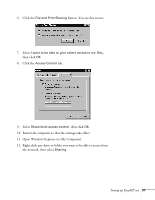
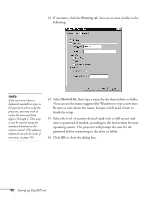
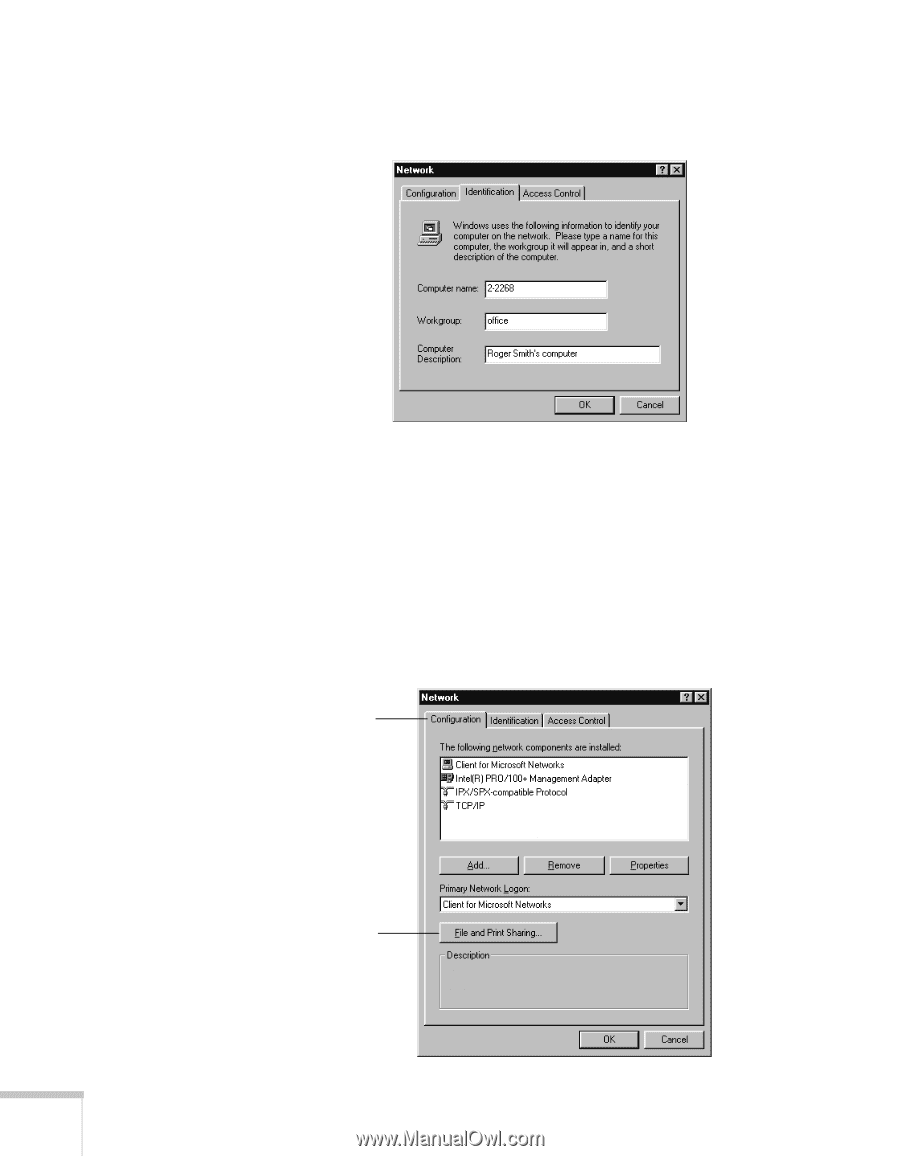
3. Click the Identification tab. You see a screen similar to the following: 4. If not already established, enter a name for the computer and its workgroup (or domain in Windows NT). Be sure to note down the computer name, because you'll need it later to finish the setup. For Windows 95 or 98, continue with the following steps. For Windows NT or 2000, click OK to close the dialog box and then skip ahead to step step 11. 5. Click the Configuration tab. click here... ...then click here 56 Setting up EasyMP.net
-
 1
1 -
2
-
3
-
4
-
5
-
6
-
7
-
8
-
9
-
10
-
11
-
12
-
13
-
14
-
15
-
16
-
17
-
18
-
19
-
20
-
21
-
22
-
23
-
24
-
25
-
26
-
27
-
28
-
29
-
30
-
31
-
32
-
33
-
34
-
35
-
36
-
37
-
38
-
39
-
40
-
41
-
42
-
43
-
44
-
45
-
46
-
47
-
48
-
49
-
50
-
51
-
 52
52 -
 53
53 -
 54
54 -
 55
55 -
 56
56 -
 57
57 -
 58
58 -
 59
59 -
 60
60 -
 61
61 -
 62
62 -
63
-
64
-
65
-
66
-
67
-
68
-
69
-
70
-
71
-
72
-
73
-
74
-
75
-
76
-
77
-
78
-
79
-
80
-
81
-
82
-
83
-
84
-
85
-
86
-
87
-
88
-
89
-
90
-
91
-
92
-
93
-
94
-
95
-
96
-
97
-
98
-
99
-
100
-
101
-
102
-
103
-
104
-
105
-
106
-
107
-
108
-
109
-
110
-
111
-
112
-
113
-
114
-
115
-
116
-
117
-
118
-
119
-
120
-
121
-
122
-
123
-
124
-
125
-
126
-
127
-
128
-
129
-
130
-
131
-
132
-
133
-
134
-
135
 |
 |
56
Setting up EasyMP.net
3.
Click the
Identification
tab. You see a screen similar to the
following:
4.
If not already established, enter a name for the computer and its
workgroup (or domain in Windows NT). Be sure to note down
the computer name, because you
’
ll need it later to finish the
setup.
For Windows 95 or 98, continue with the following steps. For
Windows NT or 2000, click
OK
to close the dialog box and then skip
ahead to step step 11.
5.
Click the
Configuration
tab.
...then
click
here
click
here...