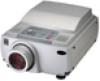
Epson PowerLite 8150i Administrator's Manual - Page 9
Using this Manual to Set Up the Projector
 |
View all Epson PowerLite 8150i manuals
Add to My Manuals
Save this manual to your list of manuals |
Page 9 highlights
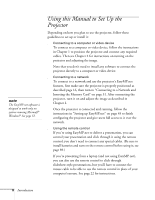
note The EasyMP.net software is designed to work only on systems running Microsoft® Windows®. See page 52. Using this Manual to Set Up the Projector Depending on how you plan to use the projector, follow these guidelines to set up or install it: s Connecting to a computer or video device To connect to a computer or video device, follow the instructions in Chapter 1 to position the projector and connect any required cables. Then see Chapter 2 for instructions on turning on the projector and adjusting the image. Note that you don't need to install any software to connect the projector directly to a computer or video device. s Connecting to a network To connect to a network and use the projector's EasyMP.net features, first make sure the projector is properly positioned as described page 16, then turn to "Connecting to a Network and Inserting the Memory Card" on page 31. After connecting the projector, turn it on and adjust the image as described in Chapter 2. Once the projector is connected and running, follow the instructions in "Setting up EasyMP.net" on page 45 to finish configuring the projector and give users full access to it over the network. s Using the remote control If you're using EasyMP.net to deliver a presentation, you can control your presentation and click through it using the remote control; you don't need to connect any special cables. (Be sure to install batteries and turn on the remote control before using it; see page 89.) If you're presenting from a laptop (and not using EasyMP.net), you can also use the remote control to click through slideshow-style presentations, but you'll have to connect the mouse cable to be able to use the remote control in place of your computer's mouse. See page 22 for instructions. 8 Introduction
-
 1
1 -
2
-
3
-
 4
4 -
 5
5 -
 6
6 -
 7
7 -
 8
8 -
 9
9 -
 10
10 -
 11
11 -
 12
12 -
 13
13 -
 14
14 -
15
-
16
-
17
-
18
-
19
-
20
-
21
-
22
-
23
-
24
-
25
-
26
-
27
-
28
-
29
-
30
-
31
-
32
-
33
-
34
-
35
-
36
-
37
-
38
-
39
-
40
-
41
-
42
-
43
-
44
-
45
-
46
-
47
-
48
-
49
-
50
-
51
-
52
-
53
-
54
-
55
-
56
-
57
-
58
-
59
-
60
-
61
-
62
-
63
-
64
-
65
-
66
-
67
-
68
-
69
-
70
-
71
-
72
-
73
-
74
-
75
-
76
-
77
-
78
-
79
-
80
-
81
-
82
-
83
-
84
-
85
-
86
-
87
-
88
-
89
-
90
-
91
-
92
-
93
-
94
-
95
-
96
-
97
-
98
-
99
-
100
-
101
-
102
-
103
-
104
-
105
-
106
-
107
-
108
-
109
-
110
-
111
-
112
-
113
-
114
-
115
-
116
-
117
-
118
-
119
-
120
-
121
-
122
-
123
-
124
-
125
-
126
-
127
-
128
-
129
-
130
-
131
-
132
-
133
-
134
-
135
 |
 |