Epson PowerLite 8150i Administrator's Manual - Page 76
Capturing Images, Capturing an Image on the Memory Card
 |
View all Epson PowerLite 8150i manuals
Add to My Manuals
Save this manual to your list of manuals |
Page 76 highlights
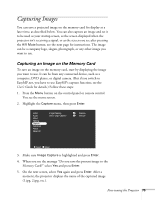
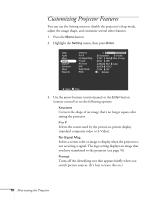
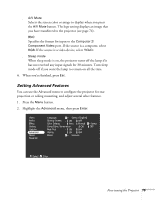
Capturing Images You can save a projected image on the memory card for display at a later time, as described below. You can also capture an image and set it to be used as your startup screen, as the screen displayed when the projector isn't receiving a signal, or as the screen you see after pressing the A/V Mute button; see the next page for instructions. The image can be a company logo, slogan, photograph, or any other image you want to use. Capturing an Image on the Memory Card To save an image on the memory card, start by displaying the image you want to use. It can be from any connected device, such as a computer, DVD player, or digital camera. (But if you switch to EasyMP.net, you have to use EasyMP's capture function; see the User's Guide for details.) Follow these steps: 1. Press the Menu button on the control panel or remote control. You see the menu screen. 2. Highlight the Capture menu, then press Enter. Video Audio Effect Setting Capture Advanced About Reset All Image Capture User's Logo Capture Execute Execute :Select :Enter 3. Make sure Image Capture is highlighted and press Enter. 4. When you see the message "Do you save the present image to the Memory Card?" select Yes and press Enter. 5. On the next screen, select Yes again and press Enter. After a moment, the projector displays the name of the captured image (1.jpg, 2.jpg, etc.). Fine-tuning the Projector 75
-
 1
1 -
2
-
3
-
4
-
5
-
6
-
7
-
8
-
9
-
10
-
11
-
12
-
13
-
14
-
15
-
16
-
17
-
18
-
19
-
20
-
21
-
22
-
23
-
24
-
25
-
26
-
27
-
28
-
29
-
30
-
31
-
32
-
33
-
34
-
35
-
36
-
37
-
38
-
39
-
40
-
41
-
42
-
43
-
44
-
45
-
46
-
47
-
48
-
49
-
50
-
51
-
52
-
53
-
54
-
55
-
56
-
57
-
58
-
59
-
60
-
61
-
62
-
63
-
64
-
65
-
66
-
67
-
68
-
69
-
70
-
 71
71 -
 72
72 -
 73
73 -
 74
74 -
 75
75 -
 76
76 -
 77
77 -
 78
78 -
 79
79 -
 80
80 -
 81
81 -
82
-
83
-
84
-
85
-
86
-
87
-
88
-
89
-
90
-
91
-
92
-
93
-
94
-
95
-
96
-
97
-
98
-
99
-
100
-
101
-
102
-
103
-
104
-
105
-
106
-
107
-
108
-
109
-
110
-
111
-
112
-
113
-
114
-
115
-
116
-
117
-
118
-
119
-
120
-
121
-
122
-
123
-
124
-
125
-
126
-
127
-
128
-
129
-
130
-
131
-
132
-
133
-
134
-
135
 |
 |