Epson Stylus Pro 10000 - Photographic Dye Ink User Manual - Page 126
light goes off. Then close the ink compartment cover., t force the cartridge.
 |
View all Epson Stylus Pro 10000 - Photographic Dye Ink manuals
Add to My Manuals
Save this manual to your list of manuals |
Page 126 highlights
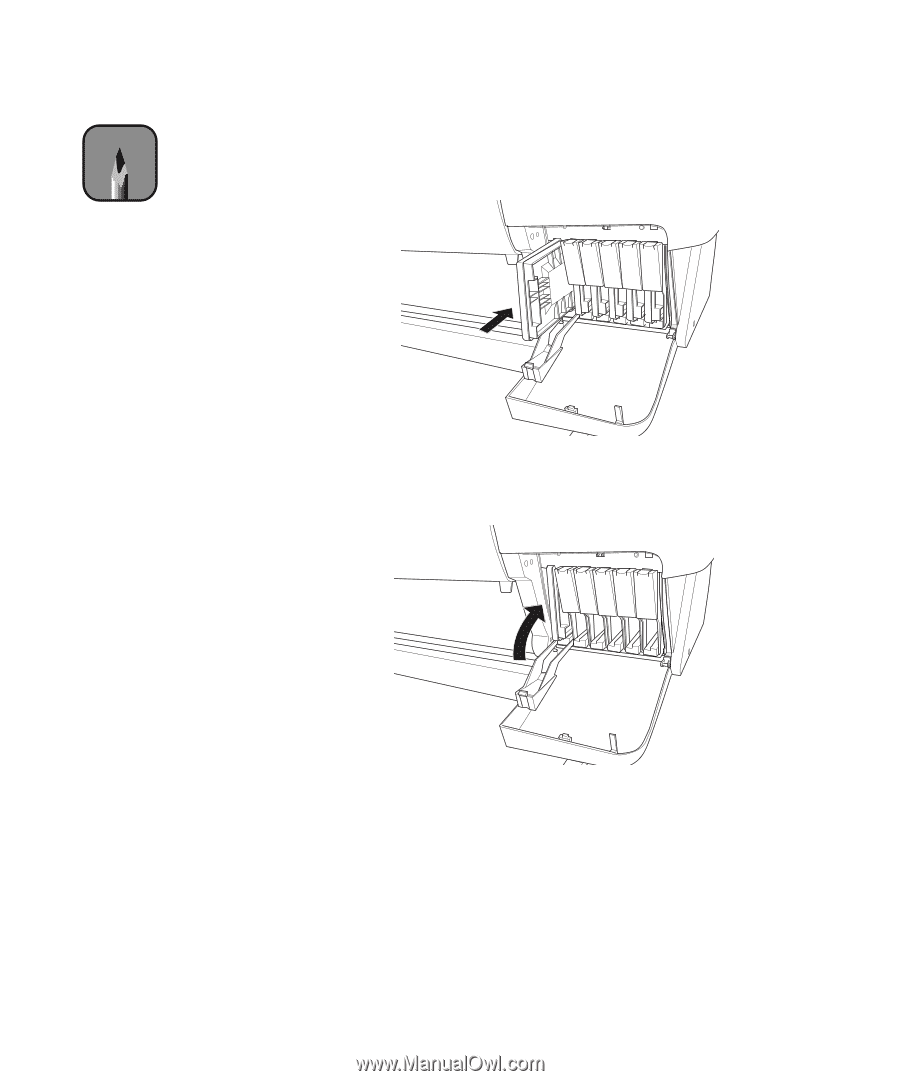
6-10 | Maintaining and Transporting the Printer Note If you can't insert the cartridge smoothly, you may have the wrong cartridge. Check the package and product code. If the Ink Out light remains on, the cartridge may not be installed correctly. Remove the cartridge and then reinsert it as described in step 6. 6. Hold the ink cartridge with the arrow mark on the left side and pointing to the rear of the printer. Then insert the ink cartridge into the slot. Don't force the cartridge. 7. Push the cartridge clamp back up. Make sure the corresponding Ink Out light goes off. Then close the ink compartment cover. 6-10
-
 1
1 -
2
-
3
-
4
-
5
-
6
-
7
-
8
-
9
-
10
-
11
-
12
-
13
-
14
-
15
-
16
-
17
-
18
-
19
-
20
-
21
-
22
-
23
-
24
-
25
-
26
-
27
-
28
-
29
-
30
-
31
-
32
-
33
-
34
-
35
-
36
-
37
-
38
-
39
-
40
-
41
-
42
-
43
-
44
-
45
-
46
-
47
-
48
-
49
-
50
-
51
-
52
-
53
-
54
-
55
-
56
-
57
-
58
-
59
-
60
-
61
-
62
-
63
-
64
-
65
-
66
-
67
-
68
-
69
-
70
-
71
-
72
-
73
-
74
-
75
-
76
-
77
-
78
-
79
-
80
-
81
-
82
-
83
-
84
-
85
-
86
-
87
-
88
-
89
-
90
-
91
-
92
-
93
-
94
-
95
-
96
-
97
-
98
-
99
-
100
-
101
-
102
-
103
-
104
-
105
-
106
-
107
-
108
-
109
-
110
-
111
-
112
-
113
-
114
-
115
-
116
-
117
-
118
-
119
-
120
-
 121
121 -
 122
122 -
 123
123 -
 124
124 -
 125
125 -
 126
126 -
 127
127 -
 128
128 -
 129
129 -
 130
130 -
 131
131 -
132
-
133
-
134
-
135
-
136
-
137
-
138
-
139
-
140
-
141
-
142
-
143
-
144
-
145
-
146
-
147
-
148
-
149
-
150
-
151
-
152
-
153
-
154
-
155
-
156
-
157
-
158
-
159
-
160
-
161
-
162
-
163
-
164
-
165
-
166
-
167
-
168
 |
 |
6-10
6-10
|
Maintaining and Transporting the Printer
6.
Hold the ink cartridge with the arrow mark on the left side and pointing
to the rear of the printer. Then insert the ink cartridge into the slot.
Don
’
t force the cartridge.
7.
Push the cartridge clamp back up. Make sure the corresponding
Ink Out
light goes off. Then close the ink compartment cover.
Note
If you can
’
t insert the
cartridge smoothly, you
may have the wrong
cartridge. Check
the package and
product code.
If the
Ink Out
light
remains on, the cartridge
may not be installed
correctly. Remove
the cartridge and
then reinsert it as
described in step 6.