Epson Stylus Pro 10000 - Photographic Dye Ink User Manual - Page 24
Loading the Roll Paper, Follow these steps to load the roll paper for printing
 |
View all Epson Stylus Pro 10000 - Photographic Dye Ink manuals
Add to My Manuals
Save this manual to your list of manuals |
Page 24 highlights
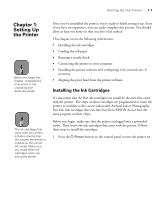
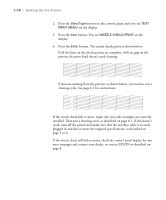
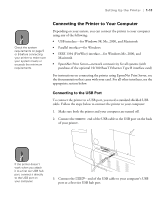
1-6 | Setting Up the Printer Note 3. Place the black end of the spindle into the corresponding left mounting bracket inside the printer. When you remove the spindle, lift the left end out first. See page 2-8 for details on removing paper from the spindle. Loading the Roll Paper Follow these steps to load the roll paper for printing: Note 1. Press the Paper Source button on the control panel until the Roll Auto Cut light comes on. To avoid feeding excess paper, make sure you don't select Sheet when you're using roll paper. 1-6
-
 1
1 -
2
-
3
-
4
-
5
-
6
-
7
-
8
-
9
-
10
-
11
-
12
-
13
-
14
-
15
-
16
-
17
-
18
-
 19
19 -
 20
20 -
 21
21 -
 22
22 -
 23
23 -
 24
24 -
 25
25 -
 26
26 -
 27
27 -
 28
28 -
 29
29 -
30
-
31
-
32
-
33
-
34
-
35
-
36
-
37
-
38
-
39
-
40
-
41
-
42
-
43
-
44
-
45
-
46
-
47
-
48
-
49
-
50
-
51
-
52
-
53
-
54
-
55
-
56
-
57
-
58
-
59
-
60
-
61
-
62
-
63
-
64
-
65
-
66
-
67
-
68
-
69
-
70
-
71
-
72
-
73
-
74
-
75
-
76
-
77
-
78
-
79
-
80
-
81
-
82
-
83
-
84
-
85
-
86
-
87
-
88
-
89
-
90
-
91
-
92
-
93
-
94
-
95
-
96
-
97
-
98
-
99
-
100
-
101
-
102
-
103
-
104
-
105
-
106
-
107
-
108
-
109
-
110
-
111
-
112
-
113
-
114
-
115
-
116
-
117
-
118
-
119
-
120
-
121
-
122
-
123
-
124
-
125
-
126
-
127
-
128
-
129
-
130
-
131
-
132
-
133
-
134
-
135
-
136
-
137
-
138
-
139
-
140
-
141
-
142
-
143
-
144
-
145
-
146
-
147
-
148
-
149
-
150
-
151
-
152
-
153
-
154
-
155
-
156
-
157
-
158
-
159
-
160
-
161
-
162
-
163
-
164
-
165
-
166
-
167
-
168
 |
 |

1-6
1-6
|
Setting Up the Printer
3.
Place the black end of the spindle into the corresponding left mounting
bracket inside the printer.
Loading the Roll Paper
Follow these steps to load the roll paper for printing:
1.
Press the
Paper Source
button on the control panel until the
Roll
Auto
Cut
light comes on.
Note
When you remove the
spindle, lift the left end
out first. See page 2-8 for
details on removing paper
from the spindle.
Note
To avoid feeding excess
paper, make sure you
don’t select
Sheet
when
you’re using roll paper.