Epson Stylus Pro 10000 - Photographic Dye Ink User Manual - Page 29
Connecting the Printer to Your Computer, Connecting to the USB Port
 |
View all Epson Stylus Pro 10000 - Photographic Dye Ink manuals
Add to My Manuals
Save this manual to your list of manuals |
Page 29 highlights
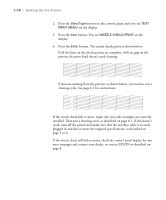
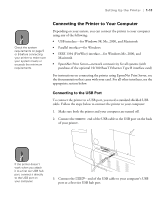
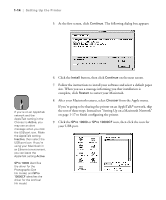
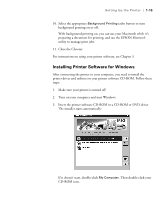
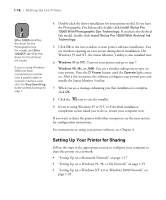
Setting Up the Printer | 1-11 Note Check the system requirements on page 5 or 6 before connecting your printer to make sure your system meets or exceeds the minimum requirements. Connecting the Printer to Your Computer Depending on your system, you can connect the printer to your computer using any of the following: • USB interface-for Windows 98, Me, 2000, and Macintosh • Parallel interface-for Windows • IEEE 1394 (FireWire) interface-for Windows Me, 2000, and Macintosh • EpsonNet Print Server-network connectivity for all systems (with purchase of the optional 10/100 BaseT Ethernet Type B interface card) For instructions on connecting the printer using EpsonNet Print Server, see the documentation that came with your card. For all other interfaces, see the appropriate section below. Connecting to the USB Port To connect the printer to a USB port, you need a standard shielded USB cable. Follow the steps below to connect the printer to your computer: 1. Make sure both the printer and your computer are turned off. 2. Connect the of your printer. end of the USB cable to the USB port on the back Note If the printer doesn't work when you attach it to a first tier USB hub port, connect it directly to the USB port on your computer. 3. Connect the end of the USB cable to your computer's USB port or a first tier USB hub port. 1-11
-
 1
1 -
2
-
3
-
4
-
5
-
6
-
7
-
8
-
9
-
10
-
11
-
12
-
13
-
14
-
15
-
16
-
17
-
18
-
19
-
20
-
21
-
22
-
23
-
 24
24 -
 25
25 -
 26
26 -
 27
27 -
 28
28 -
 29
29 -
 30
30 -
 31
31 -
 32
32 -
 33
33 -
 34
34 -
35
-
36
-
37
-
38
-
39
-
40
-
41
-
42
-
43
-
44
-
45
-
46
-
47
-
48
-
49
-
50
-
51
-
52
-
53
-
54
-
55
-
56
-
57
-
58
-
59
-
60
-
61
-
62
-
63
-
64
-
65
-
66
-
67
-
68
-
69
-
70
-
71
-
72
-
73
-
74
-
75
-
76
-
77
-
78
-
79
-
80
-
81
-
82
-
83
-
84
-
85
-
86
-
87
-
88
-
89
-
90
-
91
-
92
-
93
-
94
-
95
-
96
-
97
-
98
-
99
-
100
-
101
-
102
-
103
-
104
-
105
-
106
-
107
-
108
-
109
-
110
-
111
-
112
-
113
-
114
-
115
-
116
-
117
-
118
-
119
-
120
-
121
-
122
-
123
-
124
-
125
-
126
-
127
-
128
-
129
-
130
-
131
-
132
-
133
-
134
-
135
-
136
-
137
-
138
-
139
-
140
-
141
-
142
-
143
-
144
-
145
-
146
-
147
-
148
-
149
-
150
-
151
-
152
-
153
-
154
-
155
-
156
-
157
-
158
-
159
-
160
-
161
-
162
-
163
-
164
-
165
-
166
-
167
-
168
 |
 |
