Epson Stylus Pro 10000 - Photographic Dye Ink User Manual - Page 28
installed. Then run a cleaning cycle, as described on If this doesn't
 |
View all Epson Stylus Pro 10000 - Photographic Dye Ink manuals
Add to My Manuals
Save this manual to your list of manuals |
Page 28 highlights
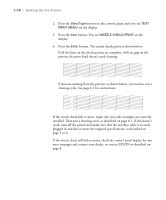
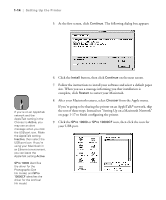
1-10 | Setting Up the Printer 2. Press the SelecType button on the control panel until you see TEST PRINT MENU on the display. 3. Press the Item button. You see NOZZLE CHECK=PRINT on the display. 4. Press the Enter button. The nozzle check prints as shown below. If all the lines on the check pattern are complete, with no gaps in the pattern, the print head doesn't need cleaning: If dots are missing from the pattern, as shown below, you need to run a cleaning cycle. See page 6-1 for instructions. If the nozzle check fails to print, make sure your ink cartridges are correctly installed. Then run a cleaning cycle, as described on page 6-1. If this doesn't work, turn off the printer and make sure that the interface cable is securely plugged in and that it meets the required specifications, as described on page 5 or 6. If the nozzle check still fails to print, check the control panel display for any error messages and contact your dealer, or contact EPSON as described on page 4. 1-10
-
 1
1 -
2
-
3
-
4
-
5
-
6
-
7
-
8
-
9
-
10
-
11
-
12
-
13
-
14
-
15
-
16
-
17
-
18
-
19
-
20
-
21
-
22
-
 23
23 -
 24
24 -
 25
25 -
 26
26 -
 27
27 -
 28
28 -
 29
29 -
 30
30 -
 31
31 -
 32
32 -
 33
33 -
34
-
35
-
36
-
37
-
38
-
39
-
40
-
41
-
42
-
43
-
44
-
45
-
46
-
47
-
48
-
49
-
50
-
51
-
52
-
53
-
54
-
55
-
56
-
57
-
58
-
59
-
60
-
61
-
62
-
63
-
64
-
65
-
66
-
67
-
68
-
69
-
70
-
71
-
72
-
73
-
74
-
75
-
76
-
77
-
78
-
79
-
80
-
81
-
82
-
83
-
84
-
85
-
86
-
87
-
88
-
89
-
90
-
91
-
92
-
93
-
94
-
95
-
96
-
97
-
98
-
99
-
100
-
101
-
102
-
103
-
104
-
105
-
106
-
107
-
108
-
109
-
110
-
111
-
112
-
113
-
114
-
115
-
116
-
117
-
118
-
119
-
120
-
121
-
122
-
123
-
124
-
125
-
126
-
127
-
128
-
129
-
130
-
131
-
132
-
133
-
134
-
135
-
136
-
137
-
138
-
139
-
140
-
141
-
142
-
143
-
144
-
145
-
146
-
147
-
148
-
149
-
150
-
151
-
152
-
153
-
154
-
155
-
156
-
157
-
158
-
159
-
160
-
161
-
162
-
163
-
164
-
165
-
166
-
167
-
168
 |
 |
