Epson Stylus Pro 10000 - Photographic Dye Ink User Manual - Page 20
Setting Up the Printer, Locate the package for the black ink cartridge and open it. Remove
 |
View all Epson Stylus Pro 10000 - Photographic Dye Ink manuals
Add to My Manuals
Save this manual to your list of manuals |
Page 20 highlights
1-2 | Setting Up the Printer 2. Push the indentation on the ink compartment cover to release the lock and open the cover. INK COMPART. OPEN appears on the display on the printer's control panel. 3. Push down on the top of the first cartridge clamp and pull it forward. Caution Be careful not to touch the green computer chip on one side of the cartridge. This may affect normal operation and printing. 4. Locate the package for the black ink cartridge and open it. Remove the cartridge. If you're installing Archival Ink cartridges, shake the cartridge gently, as shown. 1-2
-
 1
1 -
2
-
3
-
4
-
5
-
6
-
7
-
8
-
9
-
10
-
11
-
12
-
13
-
14
-
 15
15 -
 16
16 -
 17
17 -
 18
18 -
 19
19 -
 20
20 -
 21
21 -
 22
22 -
 23
23 -
 24
24 -
 25
25 -
26
-
27
-
28
-
29
-
30
-
31
-
32
-
33
-
34
-
35
-
36
-
37
-
38
-
39
-
40
-
41
-
42
-
43
-
44
-
45
-
46
-
47
-
48
-
49
-
50
-
51
-
52
-
53
-
54
-
55
-
56
-
57
-
58
-
59
-
60
-
61
-
62
-
63
-
64
-
65
-
66
-
67
-
68
-
69
-
70
-
71
-
72
-
73
-
74
-
75
-
76
-
77
-
78
-
79
-
80
-
81
-
82
-
83
-
84
-
85
-
86
-
87
-
88
-
89
-
90
-
91
-
92
-
93
-
94
-
95
-
96
-
97
-
98
-
99
-
100
-
101
-
102
-
103
-
104
-
105
-
106
-
107
-
108
-
109
-
110
-
111
-
112
-
113
-
114
-
115
-
116
-
117
-
118
-
119
-
120
-
121
-
122
-
123
-
124
-
125
-
126
-
127
-
128
-
129
-
130
-
131
-
132
-
133
-
134
-
135
-
136
-
137
-
138
-
139
-
140
-
141
-
142
-
143
-
144
-
145
-
146
-
147
-
148
-
149
-
150
-
151
-
152
-
153
-
154
-
155
-
156
-
157
-
158
-
159
-
160
-
161
-
162
-
163
-
164
-
165
-
166
-
167
-
168
 |
 |

1-2
1-2
|
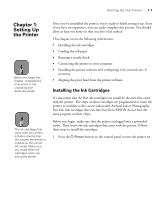
Setting Up the Printer
2.
Push the indentation on the ink compartment cover to release the lock
and open the cover.
INK COMPART. OPEN
appears on the display on
the printer’s control panel.
3.
Push down on the top of the first cartridge clamp and pull it forward.
4.
Locate the package for the black ink cartridge and open it. Remove the
cartridge. If you’re installing Archival Ink cartridges, shake the cartridge
gently, as shown.
Caution
Be careful not to touch
the green computer
chip on one side of the
cartridge. This may
affect normal operation
and printing.