Epson Stylus Pro 10000 - Photographic Dye Ink User Manual - Page 22
Loading the Roll Paper, Attaching the Roll to the Paper Spindle
 |
View all Epson Stylus Pro 10000 - Photographic Dye Ink manuals
Add to My Manuals
Save this manual to your list of manuals |
Page 22 highlights
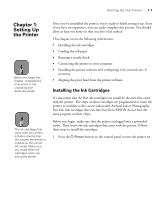
1-4 | Setting Up the Printer Loading the Roll Paper Loading roll paper involves three steps: attaching the roll to the paper spindle, inserting the spindle in the printer, and loading the paper for printing. Before you begin, remove the paper from its box and remove the plastic cap and protective covering. Then locate one of the paper spindles that was packed in your printer box. Attaching the Roll to the Paper Spindle Follow these steps to attach the roll to the spindle: 1. Slide the movable paper stop (flange) off the left end of the spindle. Note Avoid touching the printable surface of the paper as much as possible. Oils from your skin can affect print quality. 2. Position the roll so the paper unwinds as shown: 3. Slide the roll onto the spindle so it fits securely against the fixed paper stop. 4. Slide the movable paper stop back onto the spindle and insert it into the end of the roll. Make sure that it is firmly fixed into the left end of the paper roll. 1-4
-
 1
1 -
2
-
3
-
4
-
5
-
6
-
7
-
8
-
9
-
10
-
11
-
12
-
13
-
14
-
15
-
16
-
 17
17 -
 18
18 -
 19
19 -
 20
20 -
 21
21 -
 22
22 -
 23
23 -
 24
24 -
 25
25 -
 26
26 -
 27
27 -
28
-
29
-
30
-
31
-
32
-
33
-
34
-
35
-
36
-
37
-
38
-
39
-
40
-
41
-
42
-
43
-
44
-
45
-
46
-
47
-
48
-
49
-
50
-
51
-
52
-
53
-
54
-
55
-
56
-
57
-
58
-
59
-
60
-
61
-
62
-
63
-
64
-
65
-
66
-
67
-
68
-
69
-
70
-
71
-
72
-
73
-
74
-
75
-
76
-
77
-
78
-
79
-
80
-
81
-
82
-
83
-
84
-
85
-
86
-
87
-
88
-
89
-
90
-
91
-
92
-
93
-
94
-
95
-
96
-
97
-
98
-
99
-
100
-
101
-
102
-
103
-
104
-
105
-
106
-
107
-
108
-
109
-
110
-
111
-
112
-
113
-
114
-
115
-
116
-
117
-
118
-
119
-
120
-
121
-
122
-
123
-
124
-
125
-
126
-
127
-
128
-
129
-
130
-
131
-
132
-
133
-
134
-
135
-
136
-
137
-
138
-
139
-
140
-
141
-
142
-
143
-
144
-
145
-
146
-
147
-
148
-
149
-
150
-
151
-
152
-
153
-
154
-
155
-
156
-
157
-
158
-
159
-
160
-
161
-
162
-
163
-
164
-
165
-
166
-
167
-
168
 |
 |
