Epson Stylus Pro 10000 - Photographic Dye Ink User Manual - Page 45
button and repeat from step 4. Repeat this step until
 |
View all Epson Stylus Pro 10000 - Photographic Dye Ink manuals
Add to My Manuals
Save this manual to your list of manuals |
Page 45 highlights
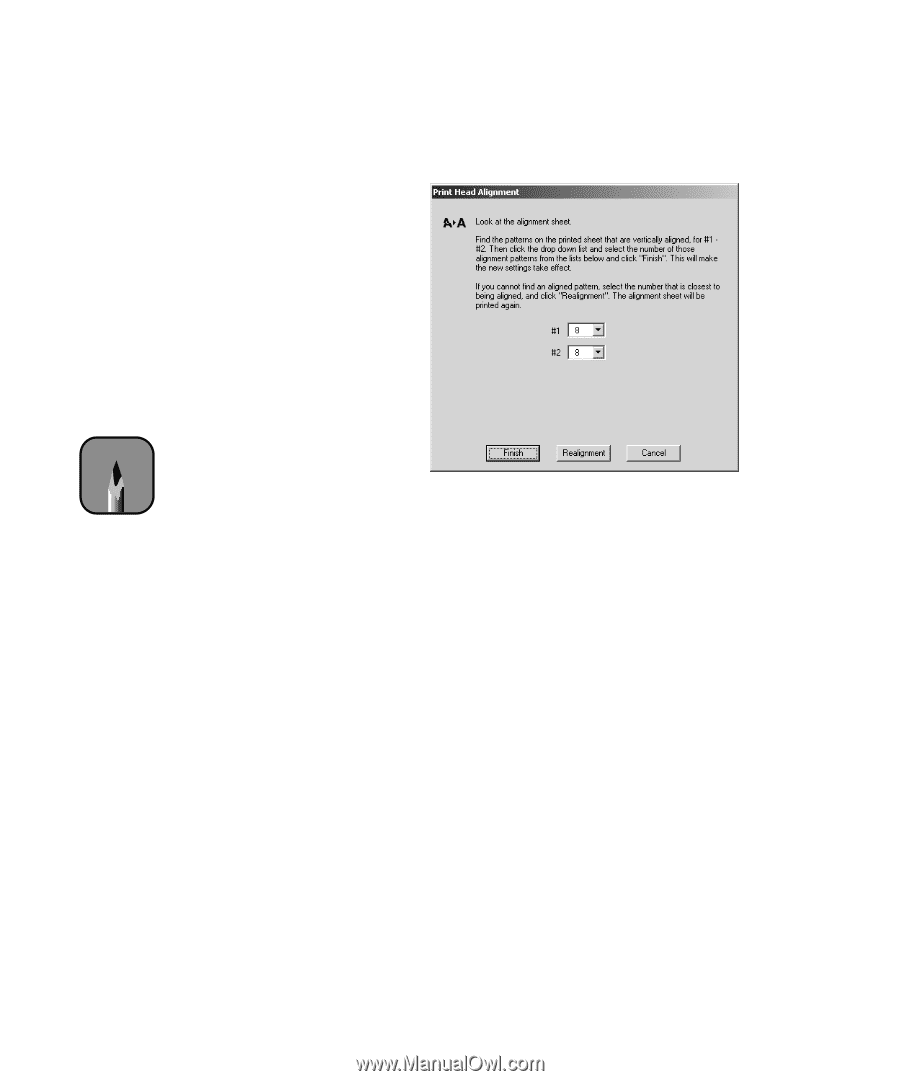
Setting Up the Printer | 1-27 8. Use the arrow keys for row #1 to select the number for the best aligned bar. Note You may have to realign the print head several times before you use the printer for the first time. 9. Repeat steps 6 through 8 for row #2. 10. If you chose a bar that did not consistently have the smallest gaps, click the Realignment button and repeat from step 4. Repeat this step until you can choose a bar that is consistently the best aligned in every pattern in the row. 11. When your alignment printout shows that bar #8 consistently has the smallest gaps for both rows, click Finish. 1-27
-
 1
1 -
2
-
3
-
4
-
5
-
6
-
7
-
8
-
9
-
10
-
11
-
12
-
13
-
14
-
15
-
16
-
17
-
18
-
19
-
20
-
21
-
22
-
23
-
24
-
25
-
26
-
27
-
28
-
29
-
30
-
31
-
32
-
33
-
34
-
35
-
36
-
37
-
38
-
39
-
 40
40 -
 41
41 -
 42
42 -
 43
43 -
 44
44 -
 45
45 -
 46
46 -
 47
47 -
 48
48 -
 49
49 -
 50
50 -
51
-
52
-
53
-
54
-
55
-
56
-
57
-
58
-
59
-
60
-
61
-
62
-
63
-
64
-
65
-
66
-
67
-
68
-
69
-
70
-
71
-
72
-
73
-
74
-
75
-
76
-
77
-
78
-
79
-
80
-
81
-
82
-
83
-
84
-
85
-
86
-
87
-
88
-
89
-
90
-
91
-
92
-
93
-
94
-
95
-
96
-
97
-
98
-
99
-
100
-
101
-
102
-
103
-
104
-
105
-
106
-
107
-
108
-
109
-
110
-
111
-
112
-
113
-
114
-
115
-
116
-
117
-
118
-
119
-
120
-
121
-
122
-
123
-
124
-
125
-
126
-
127
-
128
-
129
-
130
-
131
-
132
-
133
-
134
-
135
-
136
-
137
-
138
-
139
-
140
-
141
-
142
-
143
-
144
-
145
-
146
-
147
-
148
-
149
-
150
-
151
-
152
-
153
-
154
-
155
-
156
-
157
-
158
-
159
-
160
-
161
-
162
-
163
-
164
-
165
-
166
-
167
-
168
 |
 |
1-27
Setting Up the Printer
|
1-27
8.
Use the arrow keys
for row #1 to select the number for the best aligned
bar.
9.
Repeat steps 6 through 8 for row #2.
10.
If you chose a bar that did not consistently have the smallest gaps, click
the
Realignment
button and repeat from step 4. Repeat this step until
you can choose a bar that is consistently the best aligned in every pattern
in the row.
11.
When your alignment printout shows that bar #8 consistently has the
smallest gaps for both rows, click
Finish
.
Note
You may have to realign
the print head several
times before you use the
printer for the first time.