Epson Stylus Pro 10000 - Photographic Dye Ink User Manual - Page 43
Aligning the Print Head, Running the Print Head Alignment Utility
 |
View all Epson Stylus Pro 10000 - Photographic Dye Ink manuals
Add to My Manuals
Save this manual to your list of manuals |
Page 43 highlights
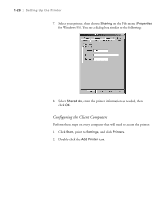
Setting Up the Printer | 1-25 TIP It's a good idea always to run a nozzle check before you align the print head. This ensures that the print head alignment patterns print correctly. Aligning the Print Head Before you use the printer, you should align the print head to ensure accurate, clean printouts. You can run the Print Head Alignment utility at this point to check software installation and make sure your printer is set up correctly. You may have to run the Print Head Alignment utility several times before your printer is ready to use. Make sure that you've run a nozzle check, as described on page 1-9, before you begin. If the print nozzles are clogged, the print head alignment patterns won't print correctly and your print head alignment won't be accurate. There are two ways to align the print head: • Using the Print Head Alignment utility in your printer software, as described below (not available if you're accessing the printer over a network) • Using the printer's control panel buttons, as described on page 6-5 Both procedures align the print head for all modes and resolutions. Running the Print Head Alignment Utility 1. Make sure the printer is turned on but not printing, and roll paper at least 24 inches wide is loaded. 2. Access the printer settings dialog box, as described on page 3-3 (Macintosh) or page 4-1 (Windows). Or, with Windows, click Start, point to Settings, and select Printers. Right-click your printer icon, then select Properties (Windows 95, 98, or Me), Document Defaults (Windows NT), or Printing Preferences (Windows 2000). 1-25
-
 1
1 -
2
-
3
-
4
-
5
-
6
-
7
-
8
-
9
-
10
-
11
-
12
-
13
-
14
-
15
-
16
-
17
-
18
-
19
-
20
-
21
-
22
-
23
-
24
-
25
-
26
-
27
-
28
-
29
-
30
-
31
-
32
-
33
-
34
-
35
-
36
-
37
-
 38
38 -
 39
39 -
 40
40 -
 41
41 -
 42
42 -
 43
43 -
 44
44 -
 45
45 -
 46
46 -
 47
47 -
 48
48 -
49
-
50
-
51
-
52
-
53
-
54
-
55
-
56
-
57
-
58
-
59
-
60
-
61
-
62
-
63
-
64
-
65
-
66
-
67
-
68
-
69
-
70
-
71
-
72
-
73
-
74
-
75
-
76
-
77
-
78
-
79
-
80
-
81
-
82
-
83
-
84
-
85
-
86
-
87
-
88
-
89
-
90
-
91
-
92
-
93
-
94
-
95
-
96
-
97
-
98
-
99
-
100
-
101
-
102
-
103
-
104
-
105
-
106
-
107
-
108
-
109
-
110
-
111
-
112
-
113
-
114
-
115
-
116
-
117
-
118
-
119
-
120
-
121
-
122
-
123
-
124
-
125
-
126
-
127
-
128
-
129
-
130
-
131
-
132
-
133
-
134
-
135
-
136
-
137
-
138
-
139
-
140
-
141
-
142
-
143
-
144
-
145
-
146
-
147
-
148
-
149
-
150
-
151
-
152
-
153
-
154
-
155
-
156
-
157
-
158
-
159
-
160
-
161
-
162
-
163
-
164
-
165
-
166
-
167
-
168
 |
 |