HP Jornada 680 HP Jornada 600 Series Handheld PC - (English) User's Guide - Page 48
To create a Remote Networking connection, To start remote synchronization, On your HP Jornada - 680e
 |
View all HP Jornada 680 manuals
Add to My Manuals
Save this manual to your list of manuals |
Page 48 highlights
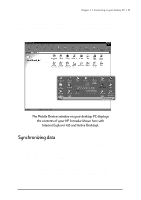
42 | HP Jornada 600 Series User’s Guide You need the following information to establish a Remote Networking connection: • Your Windows user name and password, if you are required to log on to your computer • Telephone number of the modem To create a connection to a computer not on a network (such as a home computer), you will need to create a new connection using Remote Networking on your HP Jornada. To create a Remote Networking connection 1. On the Start menu, point to Programs, point to Communication, and then tap Remote Networking. 2. In the Remote Networking folder, double-tap Make New Connection. 3. In the Make New Connection dialog box, tap Dial-up, and then tap Next. 4. If you have the HP Jornada 680 or 690, select Built-In Modem from the list of modems. If you have the HP Jornada 680e or 690e, select the appropriate option for the modem you have installed. 5. Tap TCP/IP Settings, and then tap the General tab. Make sure the Use Server-assigned IP Address check box is selected. 6. On the Name Servers tab, tap Server-assigned addresses, and then tap OK. 7. Tap Next, and then fill in the telephone number you wish to dial. Tap Finish. A new icon appears, labeled with the name you chose, in your Remote Networking folder. This connection will also appear in your remote synchronization dialog box. To set a dialing location for a Remote Networking connection, double-tap the icon for the connection in the Remote Networking folder. In the Dial-up Connection dialog box, tap Dial Properties, and then fill in the information as you would for a network or ISP connection using the HP Jornada dialup application. To start remote synchronization 1. On your HP Jornada Start menu, point to Programs, point to Communication, and then tap ActiveSync.
-
 1
1 -
2
-
3
-
4
-
5
-
6
-
7
-
8
-
9
-
10
-
11
-
12
-
13
-
14
-
15
-
16
-
17
-
18
-
19
-
20
-
21
-
22
-
23
-
24
-
25
-
26
-
27
-
28
-
29
-
30
-
31
-
32
-
33
-
34
-
35
-
36
-
37
-
38
-
39
-
40
-
41
-
42
-
 43
43 -
 44
44 -
 45
45 -
 46
46 -
 47
47 -
 48
48 -
 49
49 -
 50
50 -
 51
51 -
 52
52 -
 53
53 -
54
-
55
-
56
-
57
-
58
-
59
-
60
-
61
-
62
-
63
-
64
-
65
-
66
-
67
-
68
-
69
-
70
-
71
-
72
-
73
-
74
-
75
-
76
-
77
-
78
-
79
-
80
-
81
-
82
-
83
-
84
-
85
-
86
-
87
-
88
-
89
-
90
-
91
-
92
-
93
-
94
-
95
-
96
-
97
-
98
-
99
-
100
-
101
-
102
-
103
-
104
-
105
-
106
-
107
-
108
-
109
-
110
-
111
-
112
-
113
-
114
-
115
-
116
-
117
-
118
-
119
-
120
-
121
-
122
-
123
-
124
-
125
-
126
-
127
-
128
-
129
-
130
-
131
-
132
-
133
-
134
-
135
-
136
-
137
-
138
-
139
-
140
-
141
-
142
-
143
-
144
-
145
-
146
-
147
-
148
-
149
-
150
-
151
-
152
-
153
-
154
-
155
-
156
-
157
-
158
-
159
-
160
-
161
-
162
-
163
-
164
-
165
-
166
-
167
-
168
-
169
-
170
 |
 |