HP Neoware e90 ezRemote Manager 3.0 User Manual - Page 100
Setting the appliances for ezUpdate, Using ezUpdate to distribute NeoLinux configurations
 |
View all HP Neoware e90 manuals
Add to My Manuals
Save this manual to your list of manuals |
Page 100 highlights
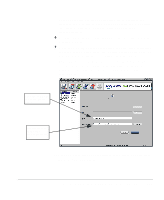
Setting the appliances for ezUpdate 4 Click the Get button. When ezRemote Manager finishes uploading the appliance's connections, the Save As button will become active. 5 Click the Save As button. The Save As dialog will open. 6 Browse to either the FTP or NFS profile directory or a temporary directory and click the Save button. The connections.rgy file that is created by this process must reside within the profile directory of the ezUpdate directory on the FTP or NFS server. Automatically applying an ezUpdate profile to your network appliances requires the appliances to be set to look for the appropriate profile. 1 Using ezRemote Manager, locate all of the appliances that you wish to use the ezUpdate profile. 2 Select these appliances in the list view, and click the Snap-Ins button in the ezRemote Manager toolbar, or select Snap-Ins from the Actions menu bar item. 3 When the Snap-In Manager appears, click the Command radio button to activate the Command field. 4 In the Command field, type sh -s "" The quotation marks are required whenever the profile name contains a space. Replace with the name given to the specific NeoLinux ezUpdate profile. Note: The of this NeoLinux ezUpdate profile must have the same name as the profile folder added to the NeoLinux ezUpdate directory on the NFS or FTP server (see "Updating connections and properties" on page 97). 5 Click the Browse button next to the Optional Input field, locate the file named install_profile.sh and click Open. 100 Using ezUpdate to distribute NeoLinux configurations
-
 1
1 -
2
-
3
-
4
-
5
-
6
-
7
-
8
-
9
-
10
-
11
-
12
-
13
-
14
-
15
-
16
-
17
-
18
-
19
-
20
-
21
-
22
-
23
-
24
-
25
-
26
-
27
-
28
-
29
-
30
-
31
-
32
-
33
-
34
-
35
-
36
-
37
-
38
-
39
-
40
-
41
-
42
-
43
-
44
-
45
-
46
-
47
-
48
-
49
-
50
-
51
-
52
-
53
-
54
-
55
-
56
-
57
-
58
-
59
-
60
-
61
-
62
-
63
-
64
-
65
-
66
-
67
-
68
-
69
-
70
-
71
-
72
-
73
-
74
-
75
-
76
-
77
-
78
-
79
-
80
-
81
-
82
-
83
-
84
-
85
-
86
-
87
-
88
-
89
-
90
-
91
-
92
-
93
-
94
-
 95
95 -
 96
96 -
 97
97 -
 98
98 -
 99
99 -
 100
100 -
 101
101 -
 102
102 -
 103
103 -
 104
104 -
 105
105 -
106
-
107
-
108
-
109
-
110
-
111
-
112
-
113
-
114
-
115
-
116
-
117
-
118
 |
 |
