HP Neoware e90 ezRemote Manager 3.0 User Manual - Page 111
Step 2. Set up a “standard” XPe configuration
 |
View all HP Neoware e90 manuals
Add to My Manuals
Save this manual to your list of manuals |
Page 111 highlights
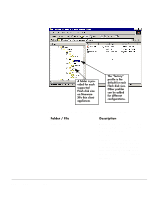
Step 2. Set up a "standard" XPe configuration • After the package is installed, there will be a new folder named \\10.10.80.10\c_drive\Inetpub\ftproot\neoware • Configure one of the XPe thin client appliances exactly as you wish all others to be configured. List View • Open the ezUpdate control panel applet (as Administrator) and: Deselect checkbox: Get Server Path URL from DCHP tag ... Select checkbox: Enable automatic configuration and software updates Enter in FTP Server: ftp://10.10.80.10 Change the Update Version to: 2 Click Save Click Cancel to exit • Log out of the XPe thin client appliance. Step 3. Save the "standard" image to the ezUpdate server • Use ezRemote Manager to copy the "standard" XPe image from the appliance configured in Step 2, above (see "XPe/NTe software cloning" on page 35). Simple XPe ezUpdate example 111
-
 1
1 -
2
-
3
-
4
-
5
-
6
-
7
-
8
-
9
-
10
-
11
-
12
-
13
-
14
-
15
-
16
-
17
-
18
-
19
-
20
-
21
-
22
-
23
-
24
-
25
-
26
-
27
-
28
-
29
-
30
-
31
-
32
-
33
-
34
-
35
-
36
-
37
-
38
-
39
-
40
-
41
-
42
-
43
-
44
-
45
-
46
-
47
-
48
-
49
-
50
-
51
-
52
-
53
-
54
-
55
-
56
-
57
-
58
-
59
-
60
-
61
-
62
-
63
-
64
-
65
-
66
-
67
-
68
-
69
-
70
-
71
-
72
-
73
-
74
-
75
-
76
-
77
-
78
-
79
-
80
-
81
-
82
-
83
-
84
-
85
-
86
-
87
-
88
-
89
-
90
-
91
-
92
-
93
-
94
-
95
-
96
-
97
-
98
-
99
-
100
-
101
-
102
-
103
-
104
-
105
-
 106
106 -
 107
107 -
 108
108 -
 109
109 -
 110
110 -
 111
111 -
 112
112 -
 113
113 -
 114
114 -
 115
115 -
 116
116 -
117
-
118
 |
 |
