HP Workstation x1000 hp workstations general - adaptec RAID installation guide - Page 37
using SMOR
 |
View all HP Workstation x1000 manuals
Add to My Manuals
Save this manual to your list of manuals |
Page 37 highlights
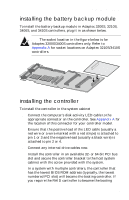
installing your controller using SMOR You need to run SMOR in systems where you need to configure the controller and set up disk arrays before the operating system has been installed. Run SMOR as directed in the installation procedures in this Installation Guide to: s Check the cache memory module after installing the controller (refer to Step 2 on page 2-8). s Configure the controller as a boot controller after installing the controller (refer to determining the booting controller on page 2-10). s Create disk arrays during driver installation (see Chapter 3). After your system is set up, you can use all of the advanced features of Storage Manager Pro or Storage Manager to modify and improve the RAID. Complete SMOR documentation is provided in the Adaptec Storage Management Software User's Guide. To run SMOR and configure a new system 1 Press Ctrl+A when the Adaptec I2O BIOS message appears during boot to start SMOR. Note: The Adaptec RAID Installation CD boot utility can create a bootable floppy disk that will run SMOR. This disk automatically starts SMOR, enabling you to perform configuration tasks when you can't start SMOR from the SCSI RAID controller using Ctrl+A. 2 Inspect the hardware configuration. a Verify that all peripheral devices and controllers are shown. If any devices are missing from the display, exit SMOR and check your hardware connections. b View the Information window for each controller to verify that all installed expansion and memory modules are shown. Write down the IRQ and address displayed in the Configuration tab-you may need this information later. 2-11
-
 1
1 -
2
-
3
-
4
-
5
-
6
-
7
-
8
-
9
-
10
-
11
-
12
-
13
-
14
-
15
-
16
-
17
-
18
-
19
-
20
-
21
-
22
-
23
-
24
-
25
-
26
-
27
-
28
-
29
-
30
-
31
-
 32
32 -
 33
33 -
 34
34 -
 35
35 -
 36
36 -
 37
37 -
 38
38 -
 39
39 -
 40
40 -
 41
41 -
 42
42 -
43
-
44
-
45
-
46
-
47
-
48
-
49
-
50
-
51
-
52
-
53
-
54
-
55
-
56
-
57
-
58
-
59
-
60
-
61
-
62
-
63
-
64
-
65
-
66
-
67
-
68
-
69
-
70
-
71
-
72
-
73
-
74
-
75
-
76
-
77
-
78
-
79
-
80
-
81
-
82
-
83
-
84
-
85
-
86
-
87
-
88
-
89
-
90
-
91
-
92
-
93
-
94
-
95
-
96
-
97
-
98
-
99
-
100
-
101
-
102
-
103
-
104
-
105
-
106
-
107
-
108
-
109
-
110
-
111
 |
 |