IBM 8669 Hardware Maintenance Manual - Page 57
Internal drives
 |
UPC - 087944636496
View all IBM 8669 manuals
Add to My Manuals
Save this manual to your list of manuals |
Page 57 highlights
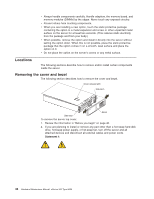
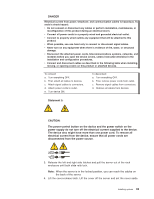
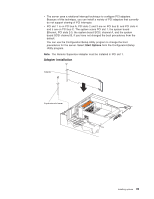
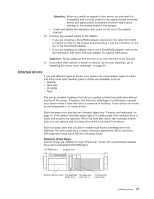
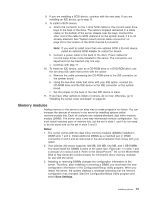
Attention: When you install an adapter in the server, be sure that it is completely and correctly seated in the system-board connector before you apply power. Incomplete insertion might cause damage to the system board or the adapter. c. Insert and tighten the expansion-slot screw on the top of the adapter bracket. 10. Connect any needed cables to the adapter. v If you are installing a ServeRAID adapter, disconnect the cable from SCSI connector A (J24) on the system board and plug it into the connector on the top of the ServeRAID adapter. v If you are installing an adapter that is not a ServeRAID adapter, refer to the documentation that came with your adapter for cabling instructions. Attention: Route cables so that the flow of air from the fans is not blocked. 11. If you have other options to install or remove, do so now; otherwise, go to "Installing the server cover and bezel" on page 64. Internal drives If you add different types of drives, your system can read multiple types of media and store more data. Several types of drives are available, such as: v Diskette v Hard disk v CD-ROM v Tape The server contains hardware that lets you replace a failed hard disk drive without turning off the server. Therefore, you have the advantage of continuing to operate your system while a hard disk drive is removed or installed. These drives are known as hot-swappable or hot-swap drives. Each hot-swap drive bay has two indicator lights (see "Controls and indicators" on page 7). If the amber hard-disk status light is lit continuously, that individual drive is faulty and needs to be replaced. When the hard-disk status light indicates a drive fault, you can replace that hot-swap drive without turning off the server. Each hot-swap drive that you plan to install must have a hot-swap-drive tray attached. The drive must have a single connector attachment (SCA) connector. Hot-swap-drive trays come with the hot-swap drives. Internal drive bays Internal drives are installed in bays. The server comes with a preinstalled diskette drive and a preinstalled CD-ROM drive. CD-ROM drive Diskette drive Empty 5.25-inch bays Hot-swap bay Hot-swap bay Hot-swap bay (SCSI ID 0) (SCSI ID 1) (SCSI ID 2) Installing options 47
-
 1
1 -
2
-
3
-
4
-
5
-
6
-
7
-
8
-
9
-
10
-
11
-
12
-
13
-
14
-
15
-
16
-
17
-
18
-
19
-
20
-
21
-
22
-
23
-
24
-
25
-
26
-
27
-
28
-
29
-
30
-
31
-
32
-
33
-
34
-
35
-
36
-
37
-
38
-
39
-
40
-
41
-
42
-
43
-
44
-
45
-
46
-
47
-
48
-
49
-
50
-
51
-
 52
52 -
 53
53 -
 54
54 -
 55
55 -
 56
56 -
 57
57 -
 58
58 -
 59
59 -
 60
60 -
 61
61 -
 62
62 -
63
-
64
-
65
-
66
-
67
-
68
-
69
-
70
-
71
-
72
-
73
-
74
-
75
-
76
-
77
-
78
-
79
-
80
-
81
-
82
-
83
-
84
-
85
-
86
-
87
-
88
-
89
-
90
-
91
-
92
-
93
-
94
-
95
-
96
-
97
-
98
-
99
-
100
-
101
-
102
-
103
-
104
-
105
-
106
-
107
-
108
-
109
-
110
-
111
-
112
-
113
-
114
-
115
-
116
-
117
-
118
-
119
-
120
-
121
-
122
-
123
-
124
-
125
-
126
-
127
-
128
-
129
-
130
-
131
-
132
-
133
-
134
-
135
-
136
-
137
-
138
-
139
-
140
-
141
-
142
-
143
-
144
-
145
-
146
-
147
-
148
-
149
-
150
-
151
-
152
-
153
-
154
-
155
-
156
 |
 |
