IBM 8669 Hardware Maintenance Manual - Page 64
Microprocessor installation in Models 1RX, 2RX, 4RX, 1TG, 2TG, 4TG
 |
UPC - 087944636496
View all IBM 8669 manuals
Add to My Manuals
Save this manual to your list of manuals |
Page 64 highlights
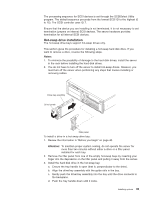
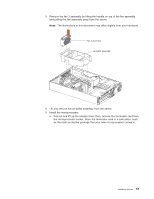
3. If two microprocessors are installed, the microprocessor installed in connector U69 is the startup processor, and the microprocessor installed in U68 is the application processor. Attention: To avoid damage and ensure proper server operation when you install a new or an additional microprocessor, use microprocessors that have the same cache size and type, and the same clock speed. Microprocessor internal and external clock frequencies must be identical. Microprocessor installation in Models 1RX, 2RX, 4RX, 1TG, 2TG, 4TG To install an additional microprocessor in Models 1RX, 2RX, 4RX, 1TG, 2TG, 4TG: 1. Review the information in "Before you begin" on page 40. 2. Turn off the server and peripheral devices and disconnect all external cables and power cords; then remove the cover (see "Removing the cover and bezel" on page 42). 3. Remove the fan 3 assembly by lifting the orange handle on top of the fan assembly and pulling the fan assembly away from the server. Fan 3 Air baffle 4. Remove the air baffle by grasping it at the sides and lifting it from the server. 54 Hardware Maintenance Manual: xSeries 342 Type 8669
-
 1
1 -
2
-
3
-
4
-
5
-
6
-
7
-
8
-
9
-
10
-
11
-
12
-
13
-
14
-
15
-
16
-
17
-
18
-
19
-
20
-
21
-
22
-
23
-
24
-
25
-
26
-
27
-
28
-
29
-
30
-
31
-
32
-
33
-
34
-
35
-
36
-
37
-
38
-
39
-
40
-
41
-
42
-
43
-
44
-
45
-
46
-
47
-
48
-
49
-
50
-
51
-
52
-
53
-
54
-
55
-
56
-
57
-
58
-
 59
59 -
 60
60 -
 61
61 -
 62
62 -
 63
63 -
 64
64 -
 65
65 -
 66
66 -
 67
67 -
 68
68 -
 69
69 -
70
-
71
-
72
-
73
-
74
-
75
-
76
-
77
-
78
-
79
-
80
-
81
-
82
-
83
-
84
-
85
-
86
-
87
-
88
-
89
-
90
-
91
-
92
-
93
-
94
-
95
-
96
-
97
-
98
-
99
-
100
-
101
-
102
-
103
-
104
-
105
-
106
-
107
-
108
-
109
-
110
-
111
-
112
-
113
-
114
-
115
-
116
-
117
-
118
-
119
-
120
-
121
-
122
-
123
-
124
-
125
-
126
-
127
-
128
-
129
-
130
-
131
-
132
-
133
-
134
-
135
-
136
-
137
-
138
-
139
-
140
-
141
-
142
-
143
-
144
-
145
-
146
-
147
-
148
-
149
-
150
-
151
-
152
-
153
-
154
-
155
-
156
 |
 |
