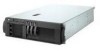
IBM 8669 Hardware Maintenance Manual - Page 60
Non-hot-swap drive installation, comes with the drive.
 |
UPC - 087944636496
View all IBM 8669 manuals
Add to My Manuals
Save this manual to your list of manuals |
Page 60 highlights
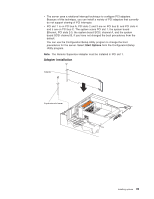
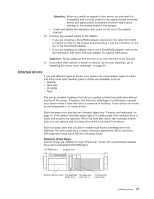
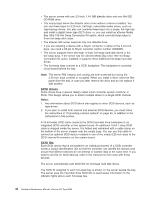
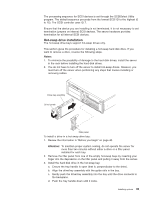
4. Check the hard disk drive status indicators to verify that the hard disk drive is operating properly. Non-hot-swap drive installation Before you install drives in the server, verify that you have all the cables and any other equipment specified in the documentation that comes with the internal drive. You might also need to perform certain preinstallation activities. Some of the steps are required only during the initial installation of an option. Slide rail Drive Slide rail Slide rails Side latches Filler panel To install a non-hot-swap drive: 1. Review the information in"Before you begin" on page 40. 2. Turn off the server and peripheral devices and then remove the cover and bezel. (See "Removing the cover and bezel" on page 42.) 3. Remove the filler panel from the bay opening by pushing in the side latches and pulling the filler panel away from the server. You do not need the filler panel when you have a drive installed in the bay. Note: The electromagnetic interference (EMI) integrity and cooling are protected by having the non-hot-swap bays covered or occupied. When you install a drive, save the filler panel from the bay, in case you later remove the drive and do not replace it with another. 4. Touch the static-protective bag containing the drive to any unpainted metal surface on the server; then, remove the drive from the bag and place it on a static-protective surface. 5. Set any jumpers or switches on the drive according to the documentation that comes with the drive. 6. Install rails on the drive. v If you are installing a standard-size drive: a. Pull the blue slide rails off the back of the filler panel. b. Clip the rails onto the sides of the drive. v If you are installing a digital linear tape (DLT) backup drive, use the metal slide rails and screws that are shipped in the box that contains the server documentation. 7. Place the drive so that the slide rails engage in the bay guide rails. Push the drive into the bay until it clicks into place. 50 Hardware Maintenance Manual: xSeries 342 Type 8669
-
 1
1 -
2
-
3
-
4
-
5
-
6
-
7
-
8
-
9
-
10
-
11
-
12
-
13
-
14
-
15
-
16
-
17
-
18
-
19
-
20
-
21
-
22
-
23
-
24
-
25
-
26
-
27
-
28
-
29
-
30
-
31
-
32
-
33
-
34
-
35
-
36
-
37
-
38
-
39
-
40
-
41
-
42
-
43
-
44
-
45
-
46
-
47
-
48
-
49
-
50
-
51
-
52
-
53
-
54
-
 55
55 -
 56
56 -
 57
57 -
 58
58 -
 59
59 -
 60
60 -
 61
61 -
 62
62 -
 63
63 -
 64
64 -
 65
65 -
66
-
67
-
68
-
69
-
70
-
71
-
72
-
73
-
74
-
75
-
76
-
77
-
78
-
79
-
80
-
81
-
82
-
83
-
84
-
85
-
86
-
87
-
88
-
89
-
90
-
91
-
92
-
93
-
94
-
95
-
96
-
97
-
98
-
99
-
100
-
101
-
102
-
103
-
104
-
105
-
106
-
107
-
108
-
109
-
110
-
111
-
112
-
113
-
114
-
115
-
116
-
117
-
118
-
119
-
120
-
121
-
122
-
123
-
124
-
125
-
126
-
127
-
128
-
129
-
130
-
131
-
132
-
133
-
134
-
135
-
136
-
137
-
138
-
139
-
140
-
141
-
142
-
143
-
144
-
145
-
146
-
147
-
148
-
149
-
150
-
151
-
152
-
153
-
154
-
155
-
156
 |
 |
