IBM 8669 Hardware Maintenance Manual - Page 66
Microprocessor installation in Model 5RX, If you have other options to install or remove
 |
UPC - 087944636496
View all IBM 8669 manuals
Add to My Manuals
Save this manual to your list of manuals |
Page 66 highlights
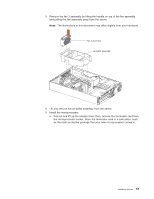
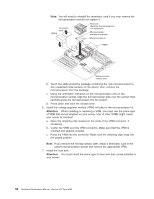
10. Set the fan sink into place. Fan sink (Remove thermal tape liner on installation) Microprocessor release lever Ensure correct alignment of fan sink, mounting clip, and mounting socket Make sure the fan sink guide fits between the processor and the processor socket. Fan sink guide Spring retention clip 11. Press down and latch the spring retention clip on the back of the fan sink (the side facing the back of the server). 12. Press down and latch the spring retention clip on the front of the fan sink (the side facing the front o f the server). 13. Plug the fan sink into the fan sink connector on the system board (J46). Make sure the cable is not in a position to interfere with the fan sink operation. 14. Reinstall the air baffle. Make sure the sides of the air baffle fit inside the brackets on the server. 15. Reinstall the fan 3 assembly and make sure that the connector engages. 16. If you have other options to install or remove, do so now; otherwise, go to "Installing the server cover and bezel" on page 64. Microprocessor installation in Model 5RX To install an additional microprocessor in Model 5RX: 1. Review the information in "Before you begin" on page 40. 2. Turn off the server and peripheral devices and disconnect all external cables and power cords; then remove the cover (see "Removing the cover and bezel" on page 42). 56 Hardware Maintenance Manual: xSeries 342 Type 8669
-
 1
1 -
2
-
3
-
4
-
5
-
6
-
7
-
8
-
9
-
10
-
11
-
12
-
13
-
14
-
15
-
16
-
17
-
18
-
19
-
20
-
21
-
22
-
23
-
24
-
25
-
26
-
27
-
28
-
29
-
30
-
31
-
32
-
33
-
34
-
35
-
36
-
37
-
38
-
39
-
40
-
41
-
42
-
43
-
44
-
45
-
46
-
47
-
48
-
49
-
50
-
51
-
52
-
53
-
54
-
55
-
56
-
57
-
58
-
59
-
60
-
 61
61 -
 62
62 -
 63
63 -
 64
64 -
 65
65 -
 66
66 -
 67
67 -
 68
68 -
 69
69 -
 70
70 -
 71
71 -
72
-
73
-
74
-
75
-
76
-
77
-
78
-
79
-
80
-
81
-
82
-
83
-
84
-
85
-
86
-
87
-
88
-
89
-
90
-
91
-
92
-
93
-
94
-
95
-
96
-
97
-
98
-
99
-
100
-
101
-
102
-
103
-
104
-
105
-
106
-
107
-
108
-
109
-
110
-
111
-
112
-
113
-
114
-
115
-
116
-
117
-
118
-
119
-
120
-
121
-
122
-
123
-
124
-
125
-
126
-
127
-
128
-
129
-
130
-
131
-
132
-
133
-
134
-
135
-
136
-
137
-
138
-
139
-
140
-
141
-
142
-
143
-
144
-
145
-
146
-
147
-
148
-
149
-
150
-
151
-
152
-
153
-
154
-
155
-
156
 |
 |
