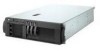
IBM 8669 Hardware Maintenance Manual - Page 59
Hot-swap drive installation, Notes, Attention
 |
UPC - 087944636496
View all IBM 8669 manuals
Add to My Manuals
Save this manual to your list of manuals |
Page 59 highlights
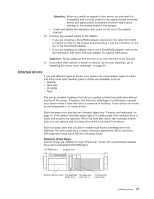
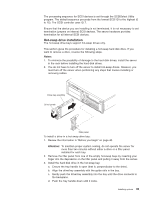
The processing sequence for SCSI devices is set through the SCSISelect Utility program. The default sequence proceeds from the lowest SCSI ID to the highest (0 to 15). The SCSI controller uses ID 7. Ensure that the device you are installing is not terminated. It is not necessary to set termination jumpers on internal SCSI devices. The server hardware provides termination for all internal SCSI devices. Hot-swap drive installation The hot-swap drive bays support hot-swap drives only. This section gives the procedure for installing a hot-swap hard disk drive. If you want to remove a drive, reverse the following steps. Notes: 1. To minimize the possibility of damage to the hard disk drives, install the server in the rack before installing the hard disk drives. 2. You do not have to turn off the server to install hot-swap drives. However, you must turn off the server when performing any steps that involve installing or removing cables. Drive-tray assembly Drive handle Filler panel To install a drive in a hot-swap drive bay: 1. Review the information in "Before you begin" on page 40. Attention: To maintain proper system cooling, do not operate the server for more than two minutes without either a drive or a filler panel installed for each bay. 2. Remove the filler panel from one of the empty hot-swap bays by inserting your finger into the depression on the filler panel and pulling it away from the server. 3. Install the hard disk drive in the hot-swap bay: a. Ensure the tray handle is open (that is, perpendicular to the drive). b. Align the drive/tray assembly with the guide rails in the bay. c. Gently push the drive/tray assembly into the bay until the drive connects to the backplane. d. Push the tray handle down until it locks. Installing options 49
-
 1
1 -
2
-
3
-
4
-
5
-
6
-
7
-
8
-
9
-
10
-
11
-
12
-
13
-
14
-
15
-
16
-
17
-
18
-
19
-
20
-
21
-
22
-
23
-
24
-
25
-
26
-
27
-
28
-
29
-
30
-
31
-
32
-
33
-
34
-
35
-
36
-
37
-
38
-
39
-
40
-
41
-
42
-
43
-
44
-
45
-
46
-
47
-
48
-
49
-
50
-
51
-
52
-
53
-
 54
54 -
 55
55 -
 56
56 -
 57
57 -
 58
58 -
 59
59 -
 60
60 -
 61
61 -
 62
62 -
 63
63 -
 64
64 -
65
-
66
-
67
-
68
-
69
-
70
-
71
-
72
-
73
-
74
-
75
-
76
-
77
-
78
-
79
-
80
-
81
-
82
-
83
-
84
-
85
-
86
-
87
-
88
-
89
-
90
-
91
-
92
-
93
-
94
-
95
-
96
-
97
-
98
-
99
-
100
-
101
-
102
-
103
-
104
-
105
-
106
-
107
-
108
-
109
-
110
-
111
-
112
-
113
-
114
-
115
-
116
-
117
-
118
-
119
-
120
-
121
-
122
-
123
-
124
-
125
-
126
-
127
-
128
-
129
-
130
-
131
-
132
-
133
-
134
-
135
-
136
-
137
-
138
-
139
-
140
-
141
-
142
-
143
-
144
-
145
-
146
-
147
-
148
-
149
-
150
-
151
-
152
-
153
-
154
-
155
-
156
 |
 |
