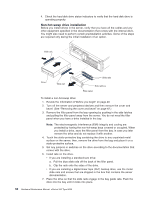
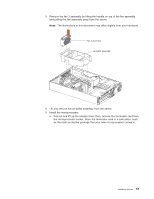
IBM 8669 Hardware Maintenance Manual - Page 62
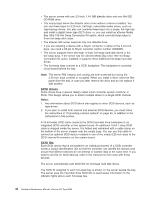
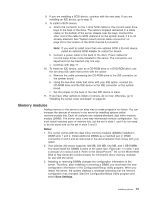
Install the DIMM, install memory in matched pairs: the first pair must be in slots 1 and 4 and
 |
UPC - 087944636496
View all IBM 8669 manuals
Add to My Manuals
Save this manual to your list of manuals |
Page 62 highlights
DIMM 1 DIMM 2 DIMM connector 4 (J4) DIMM connector 3 (J3) DIMM connector 2 (J2) DIMM connector 1 (J1) To install a DIMM: 1. Review the information in "Before you begin" on page 40, "Safety information" on page 109, and "Handling static-sensitive devices" on page 41. Also review the documentation that comes with your option. 2. Turn off the server and peripheral devices and disconnect all external cables and power cords. 3. Remove the cover. (See "Removing the cover and bezel" on page 42.) 4. Touch the static-protective package containing the DIMM to any unpainted metal surface on the server. Then, remove the DIMM from the package. You must install memory in matched pairs: the first pair must be in slots 1 and 4 and the second pair must be in slots 2 and 3. Attention: To avoid breaking the retaining clips or damaging the DIMM connectors, handle the clips gently. 5. Install the DIMM: 52 Hardware Maintenance Manual: xSeries 342 Type 8669
-
 1
1 -
2
-
3
-
4
-
5
-
6
-
7
-
8
-
9
-
10
-
11
-
12
-
13
-
14
-
15
-
16
-
17
-
18
-
19
-
20
-
21
-
22
-
23
-
24
-
25
-
26
-
27
-
28
-
29
-
30
-
31
-
32
-
33
-
34
-
35
-
36
-
37
-
38
-
39
-
40
-
41
-
42
-
43
-
44
-
45
-
46
-
47
-
48
-
49
-
50
-
51
-
52
-
53
-
54
-
55
-
56
-
 57
57 -
 58
58 -
 59
59 -
 60
60 -
 61
61 -
 62
62 -
 63
63 -
 64
64 -
 65
65 -
 66
66 -
 67
67 -
68
-
69
-
70
-
71
-
72
-
73
-
74
-
75
-
76
-
77
-
78
-
79
-
80
-
81
-
82
-
83
-
84
-
85
-
86
-
87
-
88
-
89
-
90
-
91
-
92
-
93
-
94
-
95
-
96
-
97
-
98
-
99
-
100
-
101
-
102
-
103
-
104
-
105
-
106
-
107
-
108
-
109
-
110
-
111
-
112
-
113
-
114
-
115
-
116
-
117
-
118
-
119
-
120
-
121
-
122
-
123
-
124
-
125
-
126
-
127
-
128
-
129
-
130
-
131
-
132
-
133
-
134
-
135
-
136
-
137
-
138
-
139
-
140
-
141
-
142
-
143
-
144
-
145
-
146
-
147
-
148
-
149
-
150
-
151
-
152
-
153
-
154
-
155
-
156
 |
 |
