IBM 8669 Hardware Maintenance Manual - Page 74
Installing the server cover and bezel, Attention, To replace a hot-swap fan assembly
 |
UPC - 087944636496
View all IBM 8669 manuals
Add to My Manuals
Save this manual to your list of manuals |
Page 74 highlights
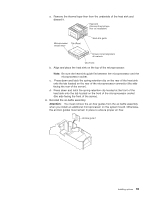
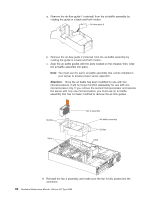
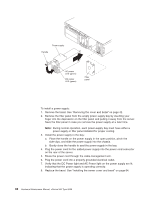
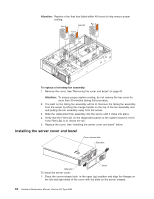
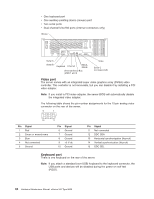
Attention: Replace a fan that has failed within 48 hours to help ensure proper cooling. Fan 2 Handle Fan 3 Fan 1 To replace a hot-swap fan assembly: 1. Remove the cover. See "Removing the cover and bezel" on page 42. Attention: To ensure proper system cooling, do not remove the top cover for more than 30 minutes during this procedure. 2. The LED on the failing fan assembly will be lit. Remove the failing fan assembly from the server by lifting the orange handle on the top of the fan assembly and and pulling the fan assembly away from the server. 3. Slide the replacement fan assembly into the server until it clicks into place. 4. Verify that the FAN LED on the diagnostics panel on the system board is not lit. If the FAN LED is lit, reseat the fan. 5. Replace the cover. See "Installing the server cover and bezel" below. Installing the server cover and bezel Cover-release latch Side latch Bezel Side latch To install the server cover: 1. Place the cover-release latch in the open (up) position and align the flanges on the left and right sides of the cover with the slots on the server chassis. 64 Hardware Maintenance Manual: xSeries 342 Type 8669
-
 1
1 -
2
-
3
-
4
-
5
-
6
-
7
-
8
-
9
-
10
-
11
-
12
-
13
-
14
-
15
-
16
-
17
-
18
-
19
-
20
-
21
-
22
-
23
-
24
-
25
-
26
-
27
-
28
-
29
-
30
-
31
-
32
-
33
-
34
-
35
-
36
-
37
-
38
-
39
-
40
-
41
-
42
-
43
-
44
-
45
-
46
-
47
-
48
-
49
-
50
-
51
-
52
-
53
-
54
-
55
-
56
-
57
-
58
-
59
-
60
-
61
-
62
-
63
-
64
-
65
-
66
-
67
-
68
-
 69
69 -
 70
70 -
 71
71 -
 72
72 -
 73
73 -
 74
74 -
 75
75 -
 76
76 -
 77
77 -
 78
78 -
 79
79 -
80
-
81
-
82
-
83
-
84
-
85
-
86
-
87
-
88
-
89
-
90
-
91
-
92
-
93
-
94
-
95
-
96
-
97
-
98
-
99
-
100
-
101
-
102
-
103
-
104
-
105
-
106
-
107
-
108
-
109
-
110
-
111
-
112
-
113
-
114
-
115
-
116
-
117
-
118
-
119
-
120
-
121
-
122
-
123
-
124
-
125
-
126
-
127
-
128
-
129
-
130
-
131
-
132
-
133
-
134
-
135
-
136
-
137
-
138
-
139
-
140
-
141
-
142
-
143
-
144
-
145
-
146
-
147
-
148
-
149
-
150
-
151
-
152
-
153
-
154
-
155
-
156
 |
 |
