Kyocera TASKalfa 406ci 306ci/356ci/406ci KX Driver Guide - Page 96
Adding or Editing a Security Watermark, Color Optimizer
 |
View all Kyocera TASKalfa 406ci manuals
Add to My Manuals
Save this manual to your list of manuals |
Page 96 highlights
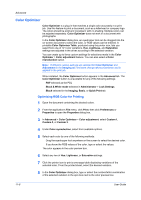
Advanced 11-6 Selecting Security Watermark sets these driver features to the following values: Watermark in the Advanced tab is set to None. Color reproduction in the Imaging tab is set to Line art. EcoPrint in Quick Print, Basic, or Imaging is set to Off. Adjustment setting in the Imaging tab is set to None. Color Optimizer in the Advanced tab is set to None. The reverse is also true. If these features are changed, then the Security Watermark selection is set to None, and cannot be used. The administrator can ensure that a security watermark is printed on all jobs by selecting Device Settings > Administrator > Lock Settings, and then selecting Security settings. Adding or Editing a Security Watermark 1 In Advanced > Security Watermark, click New to create a custom security watermark. To edit a default or custom security watermark, select it from the list. 2 Under Security watermark name, type a name to a maximum of 39 characters. A default security watermark cannot be renamed. 3 Under Lines of text, select up to 3 lines of text. This option is unavailable when editing a default security watermark. Select from the following options: None This option leaves the line blank. User defined This option inserts your text to a maximum of 39 characters. All other options display date, time, or other job information that is obtained from the computer or printer driver when the job is printed. 4 Select the desired font, size, style, and angle of the text. 5 Select a design for the security watermark background: Document guard The document guard design appears as the security watermark background. Patterns Select a design for the security watermark background. 6 Select a color for the security watermark from the Color list. The options are Black, Cyan, or Magenta. 7 Under Density and Contrast, select initial options: Light, Normal, Dark Select the shading density of the background pattern. Contrast 1-9 User Guide
-
 1
1 -
2
-
3
-
4
-
5
-
6
-
7
-
8
-
9
-
10
-
11
-
12
-
13
-
14
-
15
-
16
-
17
-
18
-
19
-
20
-
21
-
22
-
23
-
24
-
25
-
26
-
27
-
28
-
29
-
30
-
31
-
32
-
33
-
34
-
35
-
36
-
37
-
38
-
39
-
40
-
41
-
42
-
43
-
44
-
45
-
46
-
47
-
48
-
49
-
50
-
51
-
52
-
53
-
54
-
55
-
56
-
57
-
58
-
59
-
60
-
61
-
62
-
63
-
64
-
65
-
66
-
67
-
68
-
69
-
70
-
71
-
72
-
73
-
74
-
75
-
76
-
77
-
78
-
79
-
80
-
81
-
82
-
83
-
84
-
85
-
86
-
87
-
88
-
89
-
90
-
 91
91 -
 92
92 -
 93
93 -
 94
94 -
 95
95 -
 96
96 -
 97
97 -
 98
98 -
 99
99 -
 100
100 -
 101
101 -
102
-
103
 |
 |
